Getting started with xfNetLink .NET
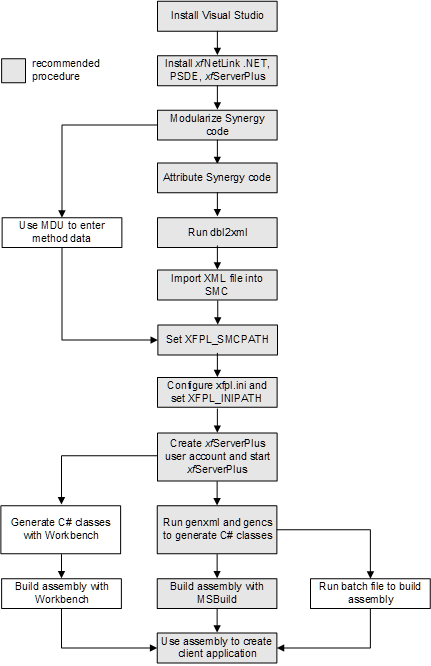
This topic lists all the steps that need to be completed to successfully create a distributed system using xfNetLink .NET. Note that these steps may not all be done by you, the Synergy developer. For example, you may create the Synergy assembly and give it to a .NET developer to create a web front-end for your application. The .NET developer may also work with a web-page developer to create the HTML portions of the user interface. However, these steps should give you a feel for everything that needs to be done, regardless of who does it.
|
1.
|
Install Visual Studio. |
|
2.
|
Install the necessary Synergy software. The components you need to install vary depending on your set-up (e.g., what OS your source files are on, where you intend to do the development, and so on). |
- The tools required to generate the C# classes from your SMC and repository definitions are part of xfNetLink .NET and must be installed on a Windows system.
- The Professional Series Development Environment (or Workbench) installation includes dbl2xml, the SMC/ELB comparison utility, the MDU and SMC files, and genxml. On Unix and OpenVMS, these utilities are part of the Synergy DBL installation.
- xfServerPlus must be installed on your Synergy server machine. The xfServerPlus installation also includes the MDU, the SMC files, and genxml. For detailed steps on setting up xfServerPlus, see Configuration overview.
|
3.
|
Modularize your existing Synergy code for the routines that you want to access remotely and encapsulate them in ELBs or shared images. See Preparing Your Synergy Server Code. |
If you choose to put the SMC somewhere other than DBLDIR, set the XFPL_SMCPATH environment variable. See Defining Your Synergy Methods.
|
5.
|
In the xfpl.ini file, set logging options for the xfServerPlus log and set logicals that point to the ELBs you specified in the SMC. You may also need to set other options in the xfpl.ini file; see Appendix A: Configuration Settings for a complete list of xfpl.ini configuration settings. |
If you choose to put the xfpl.ini file somewhere other than DBLDIR, set the XFPL_INIPATH environment variable.
For information on the log and XFPL_INIPATH, see Using server-side logging and Setting the XFPL_INIPATH environment variable. See Defining logicals for information on setting logicals that point to your ELBs.
|
6.
|
Create a user account on the xfServerPlus machine to run xfServerPlus sessions and then start xfServerPlus. See the topic for your operating system: |
|
7.
|
Generate the C# classes from the command line or with Workbench: |
- If you’re using the command line, run the genxml.dbr utility to create an XML file, and then run gencs.exe to generate the C# classes. It will also generate an MSBuild project file (.csproj file) and a batch file. You can use either of these to build the DLL. See Creating an assembly from the command line.
- If you’re using Workbench, create a Synergy/DE .NET Component project. Specify the component information: a name and location for the assembly, the location of the SMC and repository files, the namespace and key file, the interfaces you want to include, and (if desired) alternate names for those interfaces. Then use the menu option to generate the C# classes. See Creating a Synergy/DE .NET Component project and Generating C# classes.
|
9.
|
(optional; for use with Workbench and batch file only) Set the SYNCSCOPT environment variable to include C# compiler options that you want added to the command line when the assembly is built. |
|
10.
|
Build the assembly by doing one of the following: |
|
11.
|
(optional) Generate the API documentation for the methods in your assembly using a third-party utility. See Generating API documentation. |