The component generation tools enable you to create a .NET assembly of Synergy methods. The assembly can be used in any .NET Framework client application to make remote calls to Synergy routines. To create an assembly, you must to do the following:
| 1. | Create a Synergy/DE .NET Component Project in Workbench and specify information about how the assembly should be constructed. |
| 2. | Generate the C# classes. |
| 3. | Build the assembly. |
|
|
You can optionally generate C# classes and build the assembly from the command line rather than from Workbench. If your Synergy code is on Unix or OpenVMS, you can use the command-line tools to generate the XML file there, and then move the file to Windows to create the assembly. Assemblies generated and built using Workbench are compliant only with .NET Framework. If you want your assembly to be compliant with .NET 6 and higher, you must use the command line tools. If you want to include the Original property, you must use the command line; this option is not available in Workbench. |
Creating a Synergy/DE .NET Component project
|
|
To set up the .NET Framework environment correctly, launch a Visual Studio Developer Command Prompt and start Workbench (vs.exe) from there. (Previously, the .NET environment could be set within Workbench from the .NET Environment Configuration dialog, but this dialog was removed in Workbench version 11 because of changes to Visual Studio.) |
| 1. | In Workbench, select Project > New, and then select Synergy/DE .NET Component from the list of project types. (Expand the Synergy/DE node in the Project type display to select Synergy/DE .NET Component.) |
| 2. | Give the project a name in the Project name field, and indicate whether you want to create a new workspace or add the project to an existing workspace. For more information on using this dialog, as well as information about basic Workbench features, see the Workbench Help. |
|
|
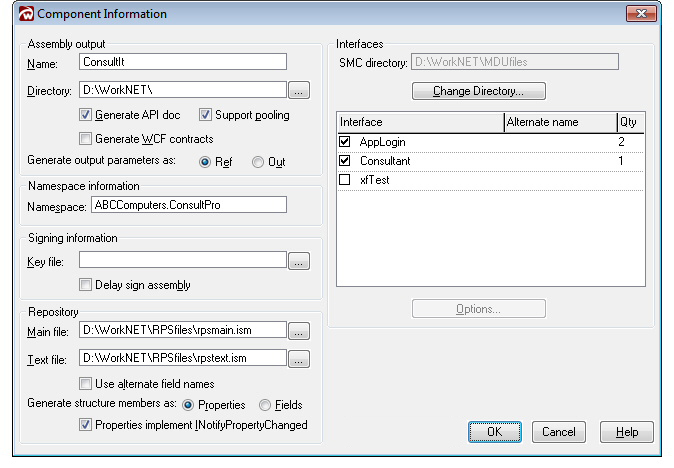
| 3. | Specify the following information in the Component Information dialog box. (This dialog displays automatically when you create a new .NET Component project. If you need to display it later, select Build > Component Information.) |
Name
Enter a name for the assembly. The default is the project name.
Directory
Specify the directory in which to create the class files and the assembly. The default is the project location. If you enter a logical in this field, it must be followed by a colon (e.g., DBLDIR:). When you generate classes, the utility will create a subdirectory within this directory, named with the assembly name, and put all the generated files in it.
Generate API doc
Indicate whether you want to create an XML file that can be used to generate API documentation. In order to have useful documentation, you must add comments for your methods and parameters. The XML file is created when you build the assembly. See Generating API documentation for more information.
Support pooling
Indicate whether you want to enable the classes in this assembly to be pooled with COM+ pooling.
|
|
Selecting the “Support pooling” option causes the generated procedural classes to be derived from the ServicedComponent class. It also changes the status of some methods from public to private or protected, and causes the getConnect() and shareConnect() methods to be excluded from the procedural classes. Thus, you should use this option only when you are certain the object will be pooled. See Understanding .NET pooling and Implementing COM+ pooling for .NET Framework for more information on pooling. |
Generate WCF contracts
Select this option if you want the assembly to use WCF contracts, such as for a web service. The generated classes will include code that makes the assembly hostable. In addition, this option changes the way ArrayList and structure collection parameters are handled: rather than being generated as ArrayLists, they are generated as List<T> parameters (where T is the data type of the elements). Consequently, in your client code, you must use a List<T> class instead of an ArrayList class for a parameter that is defined as ArrayList or structure collection in the SMC.
Generate output parameters as
Indicate whether you want “out” parameters (that is, parameters with a direction of “out” in the SMC) to be generated as “ref” or “out” types in the C# classes. Array parameters are always generated as “ref”, regardless of how this option is set. (Prior to version 9.5.1, all “out” parameters were generated as “ref”.)
Namespace
Specify a namespace for the assembly. All classes generated for the assembly will use this namespace. The namespace is used to ensure that each class is unique. Microsoft recommends that namespaces use the format CompanyName.ProductName (e.g., ABCComputers.ConsultPro). The namespace is appended to the beginning of the class name (e.g., ABCComputers.ConsultPro.MyClass). If you do not specify a namespace, the default namespace assembly_nameNS will be used.
Key file
Specify the full path and filename of the strong name key file that will be used to strong name the assembly. You must create the file using Microsoft’s sn.exe utility and place it in the desired location before building the assembly. xfNetLink .NET will verify that the file exists. See Using a key file for more information.
Delay sign assembly
Indicate whether you want to delay sign the assembly. This option is valid only when you specify a key file. See Using a key file for more information.
Repository main file
If any of the methods that will be included in this assembly pass structures as parameters, specify the location of the repository main file for those structures. This must match the repository that was used when entering data in the SMC. If you specify a main file, you must also specify a text file.
The default is the value of the environment variable RPSMFIL. If it is not defined, the default is RPSDAT:rpsmain.ism. If neither RPSMFIL nor RPSDAT are defined, the default is rpsmain.ism in the path specified in the Working directory property of the project. If the Working directory is not defined, the default is rpsmain.ism in the location where the project is stored.
Repository text file
If any of the methods that will be included in this assembly pass structures as parameters, specify the location of the repository text file for those structures. This must match the repository that was used when entering data in the SMC. If you specify a text file, you must also specify a main file.
The default is the value of the environment variable RPSTFIL. If it is not defined, the default is RPSDAT:rpstext.ism. If neither RPSTFIL nor RPSDAT are defined, the default is rpstext.ism in the path specified in the Working directory property of the project. If the Working directory is not defined, the default is rpstext.ism in the location where the project is stored.
Use alternate field names
Indicate whether you want to use the value in the Alternate name field in Repository instead of the value in the Name field as the property or field name. If not selected, the field name in the structure becomes the property/field name in the C# class. If selected, the value in the Alternate name field is used when it exists; else, the value in the Name field is used.
Generate structure members as
Indicate whether you want to generate structure members as properties with private fields or as public fields. Which you choose depends on your application. If you are planning to use .NET controls, generate properties; the properties have “get” and “set” methods, which can be assigned to .NET controls in Visual Studio. You must also generate properties to take advantage of Repository’s read-only flag and the class Changed property.
If you are not planning to use .NET controls, and don’t need the read-only flag or Changed property, you can generate either fields or properties; using fields may improve performance.
Properties implement INotifyPropertyChanged
Select this option to include the INotifyPropertyChanged class in generated structure classes. This enables you to use the PropertyChanged event on structure fields (properties) bound to controls.
SMC directory
This field displays the path for the Synergy Method Catalog that this assembly uses. The default is XFPL_SMCPATH; if it is not set, the default is DBLDIR. To change the SMC directory, click the Change Directory button. In the Browse for SMC Directory dialog box, navigate to the directory that contains the SMC, double-click to select it, and click OK. The selected path will display in the SMC directory field and the list of interfaces will be refreshed, displaying all interfaces in the selected SMC.
Interfaces
Select the interfaces you want to include in the assembly by clicking in the box to the left of the interface name. A C# class, named with the interface name, will be generated for each selected interface.
Alternate name
You can provide an alternate name for any interface you select. To specify an alternate name, highlight a selected interface, and then click the Options button to display the Interface Options dialog. Enter another name in the Alternate interface name field and click OK.
You may wish to use an alternate name if the interface name in the SMC is not what you want users to see as the class name. In addition, if your interface names differ only in case, or if you have a structure with the same name as an interface, you can use the alternate interface name to avoid having numbers appended to the class names. See the note under the Interface name field.
To remove an alternate interface name, clear the check box for the interface and then reselect it. This action will also reset the quantity to 1.
By default, a single class is generated for each selected interface; however, you can choose to generate multiple classes for any of the interfaces you select. (See Using multiple copies of the same class for why you might want to do this.) To generate multiple classes, select (and highlight) the interface, and then click the Options button to display the Interface Options dialog. Specify the total number of classes you want to generate in the “Total number of classes to generate for this interface” field and click OK. Valid values are 1 through 999.
The first instance of the class will be named as usual with the interface name (or alternate name, if specified). Subsequent instances will be named with the interface name followed by a number, which will increment.
| 4. | Click OK in the Component Information dialog box. |
Generating C# classes
To generate the C# classes, select Build > Generate C# Classes in Workbench. This command will do the following:
- Run the SMC/ELB Comparison utility, smc_elb.exe. (See SMC/ELB Comparison utility for more information).
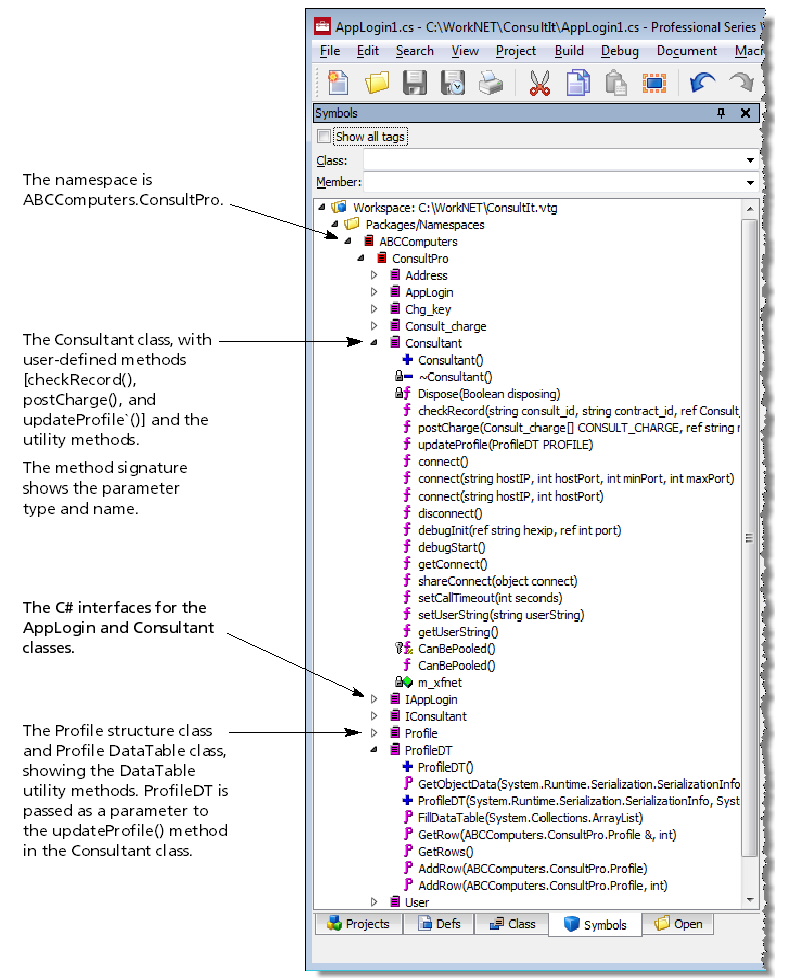
- Create a C# source file for each interface you selected in the Component Information dialog box and for each structure, group, and enumeration within the selected interfaces. There will also be a C# interface file generated for each selected interface. See Understanding the generated C# classes for more information on these files.
- Create a batch file to be used later to compile the classes, generate the assembly, and create the XML file for the API documentation.
- Create a response file named assembly_name.rsp, which is used by the batch file to compile the classes.
- Create a file named AssemblyInfo.cs, which contains information about the assembly. You can customize this file; see Editing information in AssemblyInfo.cs.
- Add the C# source files, the C# interface files, and the AssemblyInfo.cs file to the project. You can access these files from the Projects tab or the Symbols tab in the project toolbar. See figure 2.
If you have previously generated classes for this project, you will be prompted to overwrite them. If you’re regenerating classes for the same interfaces, the .cs files will be overwritten. (The AssemblyInfo.cs file is not overwritten.)
|
|
Building an assembly in Workbench
After you’ve made any necessary edits to the AssemblyInfo.cs file (see Editing information in AssemblyInfo.cs), you are ready to build the assembly.
If desired, you can pass C# compiler commands to the command line that Workbench uses to build the assembly. To do this, set the SYNCSCOPT environment variable to any valid C# compiler command either from the Workbench command line or on the Open tab of the Project Properties dialog.
| 1. | Verify that the .NET Component project is the active project. |
| 2. | (optional) Set SYNCSCOPT. |
| 3. | Select Build > Build Assembly. This command will do the following: |
- Compile the .cs files.
- Build the assembly.
- Generate an XML file named assembly_nameAPI.xml if the “Generate API doc” flag was set in the Component Information dialog box when you created the classes. See Generating API documentation for more information on what to do with this XML file.
