|
|
The instructions in this topic apply only when using COM+ pooling with .NET Framework. If you are using .NET 6 or higher, see Implementing pooling for .NET 6 and higher. (This type of pooling can also be used with .NET Framework instead of COM+ pooling.) |
This topic explains how to create and configure a pool on the client machine and how to use the pooling support methods.
Implementation overview
You must create your assembly and develop your application right from the start with pooling in mind. You’ll need to do the following:
| 1. | (optional, but recommended) Write pooling support methods (activate, initialize, etc.) and add them to the SMC. See Using the pooling support methods. |
| 2. | Create your assembly. If you wrote pooling support methods, include the interface that contains them in the assembly. Select the “Support pooling” check box in the Component Information dialog box in Workbench. (Or, if you are working from the command line, specify the -p option when you run the batch file.) See Building an assembly in Workbench or Building an assembly with the batch file. |
| 3. | Write your client-side code. See Writing code that uses pooled objects. |
| 4. | Run RegSvcs from an administrator command prompt to create a pool. See A word about bitness first, and then go to Creating a pool. |
| 5. | (optional) Set the desired options in the xfNetLink .NET Configuration Utility. See Setting options in the config file . |
| 6. | Use the Component Services utility to configure the pool. See Configuring the pool in Component Services. |
| 7. | Start the pool, and then run your application. See Starting the pool. |
A word about bitness
The bit size of a registered component is determined by both the way it is built and the version of RegSvcs.exe used to create the pool. When you run the batch file to build the assembly (or select the Build option in Workbench), the assembly will be built in “any CPU” mode. This means it can be registered as either 32-bit or 64-bit, depending on whether you use the 32- or 64-bit version of RegSvcs.exe:
- The 32-bit version is in C:\Windows\Microsoft.NET\Framework\version.
- The 64-bit version is in C:\Windows\Microsoft.NET\Framework64\version.
Creating a pool
The pool may be created automatically when you build your project in Visual Studio. If it is not, run the RegSvcs utility from a Visual Studio command prompt to create the pool. You will also need to use this utility to set up the pool when you deploy your completed application at a customer site. The RegSvcs utility is distributed with the .NET Framework. See A word about bitness above for information on specifying whether the component is registered as 32-bit or 64-bit.
For example:
regsvcs assembly.dll
where assembly is the name of your Synergy assembly. You must run this command for each Synergy assembly that uses pooling. This command creates a COM+ application (named with the assembly name) and adds the procedural classes in your assembly to the application.
Configuring the pool
Once a pool has been created, it can be configured. Most of the configuration is done in Component Services, but there are two settings in the config file that affect pooling as well. If you need to change the configuration after the pool is running, see Changing the pool configuration.
Setting options in the config file
There are two settings specific to pooling—initialize time-out and pool return—that can be set in the application configuration file or with environment variables. You may want to override the default values (30 seconds and false, respectively) for these settings. You can create settings at the default class level or for individual classes. See Specifying configuration settings for more information.
|
|
When using pooling, the configuration file must be named dllhost.exe.config and reside in the %windir%\system32 directory (for a 64-bit application) or %windir%\SysWOW64 (for a 32-bit application). |
Configuring the pool in Component Services
| 1. | From Administrative Tools, select Component Services. |
| 2. | In the tree in the left pane, expand the Component Services node and its subnodes until you see the COM+ Applications node. Expand this node and locate the node named for your Synergy assembly. (See figure 1.) |
|
|

| 3. | Expand the node for your application, and then expand the Components subnode to display the individual components. There is a component for every class in the assembly. If you created multiple copies of the same class (gencs -i option), you will see a component for each copy of the class. |
| 4. | Highlight an individual component node (e.g., ConsultIt.AppLogin.1 in figure 1) and select Action > Properties. |
| 5. | In the Properties dialog box go to the Activation tab. (See figure 2.) |
|
|
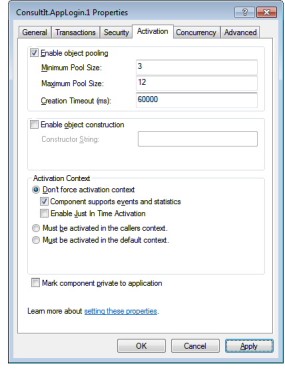
| 6. | Select the “Enable object pooling” check box (it may already be selected), and then enter values for the following: |
Minimum pool size
Enter the number of objects you want created at pool start-up. The pool will never drop below this size.
Maximum pool size
Enter the maximum number of objects that you want in the pool at any one time. When deciding how large to make the pool, keep in mind how many xfServerPlus licenses you have available and how many objects you have pooled. The maximum pool size value for all pooled objects should not exceed the number of available xfServerPlus licenses.
Creation timeout
Enter the length of time, in milliseconds, that a request should be queued when all objects in the pool are in use and the pool is at its maximum size. If the request is not satisfied within the specified time, an error is thrown.
| 7. | Select the “Component supports events and statistics” check box. This option enables you to view statistics about the pooled object, such as the pool size and the number of objects in use, in the Component Services window. See Monitoring the pool. |
| 8. | If the “Enable Just In Time Activation” check box is selected, clear it. |
| 9. | Click OK in the Properties dialog box. Repeat steps 4 through 9 above to configure each component. |
|
|
If you have problems with the pool shutting down unexpectedly, try selecting the “Leave running when idle” option on the Advanced tab of the Properties dialog box that is accessed from the COM+ application node (“ConsultPro” in figure 1). Alternatively, you may want to select “Enable idle shutdown” and increase the value in the minutes field. The pool will wait indefinitely for the first connection, but once a connection to the pool has been made, this timer starts counting. There are numerous other pooling settings that you can configure. The recommended configuration will depend upon your specific application. Refer to COM+ Object Pooling in the Microsoft documentation for details on additional settings. |
Changing the pool configuration
The pool size and creation time-out values are read when the pool is started. If you change these values in the Component Services utility, you must stop and restart the pool for the changes to take effect.
The xfNetLink .NET Configuration Utility settings (host, port, pool return, etc.) are read each time a new object is created and added to the pool. You should restart the pool after changing these settings to ensure that all objects in the pool are using the new settings.
Because restarting the pool will deactivate any objects currently in use, you may want to check the pool status before stopping the pool. See Monitoring the pool below.
|
|
If you did not check “Component supports events and statistics” when you configured the pool, you won’t be able to view statistics for the component. See step 7 above in Configuring the pool in Component Services. |
To check the status, in Component Services highlight the Components node under your COM+ application node and select View > Status View. The number of objects in use displays in the Activated column. See Monitoring Object Statistics in the Microsoft documentation for more information on this display.
Starting the pool
| 1. | Highlight the node for your COM+ application. |
| 2. | Select Action > Start. |
If you do not start the pool manually, it will be populated (that is, started) the first time a client requests an object. Note, however, that this means that the first user will have to wait for the pool to start and the objects to be initialized. Because the primary goal of pooling is to improve performance at start-up, we recommend manually starting the pool.
