Exercise one: Creating a report
You’ll create a new report that lists all plants in the database. The report will include each plant’s common name, size, and location. You’ll learn how to modify the default field headings and change the order of fields on the report.
Creating a new report
|
1.
|
Select Operations > Create new report. You are prompted to enter the report name. |
|
3.
|
Press Enter (or click OK on Windows). After you enter the name of the report, the Design menu is pulled down. |
Selecting the files to read
The Files to read function enables you to choose the files from which your report will get its data.
|
1.
|
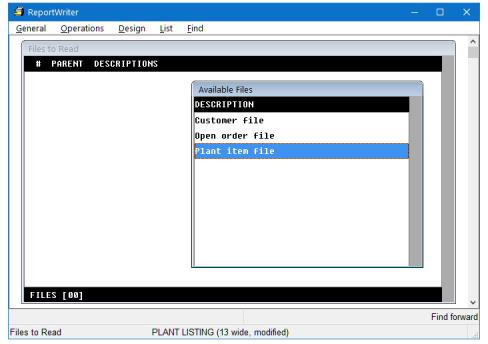
Select Design > Files to read. A list of available files is displayed, as shown in figure 1. For this report, we’ll use the plant item file. |
|
2.
|
Select Plant item file from the Available Files list. |
|
3.
|
Press the Exit shortcut. |
Selecting fields to print
Now we need to select the fields in the plant item file that we want to include in our report.
|
1.
|
Select Design > Fields to print. |
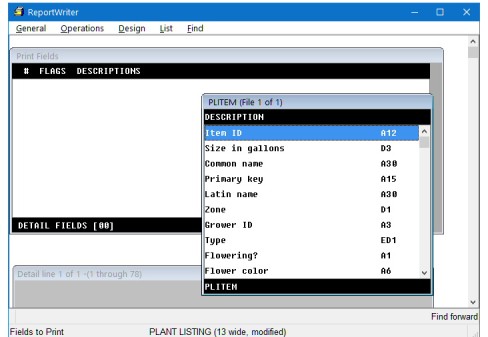
You’ll see two lists and a window. The list of available fields shows the fields available for printing in the plant item file. The Print Fields list shows the fields you’ve selected to include in the report; it’s empty until you select a field. The Detail line window at the bottom of the screen shows how your report will look, based on the fields you’ve selected. (See figure 2.)

|
You can create up to 10 detail lines for each record in your report, and each line can be up to 255 characters long. In this tutorial, we’ll work with one line of detail per record (except in exercise 4), and we’ll use just 78 characters for each line, so that the reports are easy to see on the screen.
|
Looking at the PLITEM fields list, you see the description of each field, the field data type (A for alpha, D for decimal or implied-decimal), and the field size. (If you want to see the field’s name instead of its description, select List > Toggle view or press the Toggle view shortcut.)
|
2.
|
Select Size in gallons and Common name. |
|
3.
|
Page down until Bin/aisle appears in the list, and then select Bin/aisle. |
|
4.
|
Press the Exit shortcut. |
As you select each field, you’ll see the field display in the Print Fields list and its heading and layout display in the Detail line window.
Reordering fields
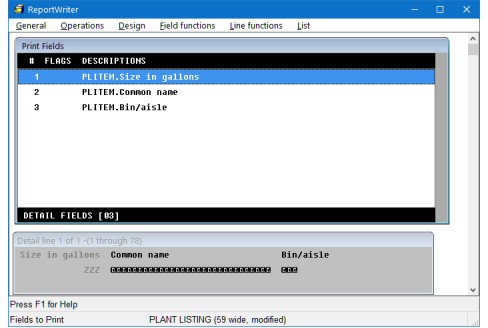
Now, your report layout should look like figure 3. The fields are displayed in the order in which you selected them. But it makes more sense to show the name of the plant first, and then its size, right? Let’s change the order of the fields to Common name, Size in gallons, Bin/aisle.
|
1.
|
In the Print Fields list, highlight PLITEM.Size in gallons. |
|
2.
|
Select Field functions > Reorder fields. |
Square brackets display around the field, indicating it is selected to move. (Press the Right Arrow key to see the right square bracket.)
|
3.
|
Use the Down Arrow key to move the field down one line, so that it’s located after PLITEM.Common name. You’ll notice that the field’s movement is also reflected in the Detail line window. |
|
4.
|
Select Field functions > Reorder fields again. |
Changing a field heading
Now that the fields are in the correct order, let’s change the “Size in gallons” heading to read “Gallons” instead.
|
1.
|
PLITEM.Size in gallons should still be highlighted; if it’s not, highlight it now. |
|
2.
|
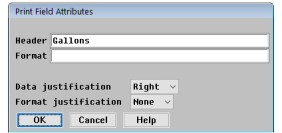
Press Enter to display the Print Field Attributes window. From here, you can change the header for this field in the report, the format of the field (used primarily with numeric data), the justification of the data (left, center, or right), and the justification of the format (none, left, or right). |
|
3.
|
Type “Gallons” in the Header field, as shown in figure 4. When you start typing, the field is automatically cleared and ready to accept new text. |
|
5.
|
Press the Exit shortcut (or click OK on Windows). Note that the heading has changed in the detail window at the bottom of your screen. |
Displaying the report
Now let’s display your first report.
|
1.
|
Press the Display report shortcut, or select Operations > Display report. The report header is displayed. |
|
2.
|
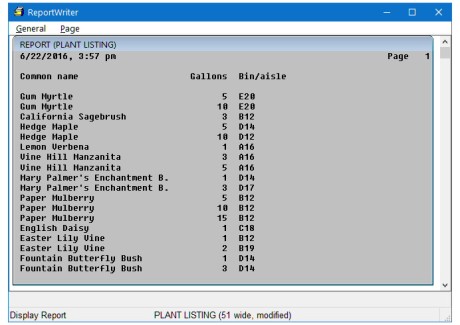
Press the Next page shortcut to view the report detail, as shown in figure 5. You can page up and down to browse through the report. Note that when you browse previously viewed pages, the Last page shortcut takes you to the last page that has been viewed. |
|
3.
|
When you’re ready to return to the menu, press the Exit shortcut. |
Summary
Go to Exercise two: Using text fields and sorting.