When a report is loaded, you can select Fields to print from the Design menu. This option enables you to select the data fields that will be printed in your report and to determine where in the report they will be printed. It also enables you to choose which fields will be totaled, to modify field headers and formats, to strip trailing blanks from specific fields, and to specify a conditional to determine whether a given field will be printed in a given report record.
You can include up to 99 fields per line, or a total of 990 fields in your report.
| 1. | Select Design > Fields to print. If you’re creating a new report, two lists and a window are displayed on the screen. If you’re working on an existing report, select Field functions > Add fields to display the list of available fields and see Adding a single field or Adding multiple fields. |
|
|
- The smaller window displays the list of available fields from the report’s primary file. For details on this window, see Displaying the list of available fields.
- The Print Fields list displays the fields currently selected to print (It will be empty in a new report.) As you select fields from the list of available fields, they are added to this list.
- Near the bottom of the screen is a window that shows you the current layout of a detail record line in your report. It will be empty in a new report.) Each field is represented by its format, if one exists, or by its default format:
@s
Alpha, user, and enumerated fields
Zs
Numeric fields
MM/DD/YY
Date fields
HH:MM
Time fields
The title of the layout window tells you which detail record line you’re currently defining. (For example, the title would be “Detail line 1 of 2” if you were on the first line of a two-line record.) Your report can contain up to 10 lines per record.
Notice that the layout window shows you the layout of the current line and tells you the range of characters being displayed. (For example, if the 79th through 158th characters were displayed on the first and only layout line, the window would be titled “Detail line 1 of 1 – (79 through 158).”) The current field highlighted in the Print Fields list is also highlighted in the layout window.
| 2. | From the list of available fields, select the first field you want to include in your report. If you need assistance, see Selecting fields. |
When you select a field, that field appears in the Print Fields list, and it is also displayed in report form in the layout window at the bottom of your screen. If you want to select a field from a different file, press Tab (or select List > Next report file) to display the next list of available fields.
| 3. | Continue selecting fields. |
As you select fields, the layout window automatically scrolls so that the currently selected field is always visible.
The total number of characters in the fields you choose (plus spacing) on the current line is computed and displayed in the lower right corner of the screen. This number is the width of the current line. (When you’re in a function other than Fields to print, this number represents the maximum line size for the report.) Your report can have a maximum width of 255 characters.
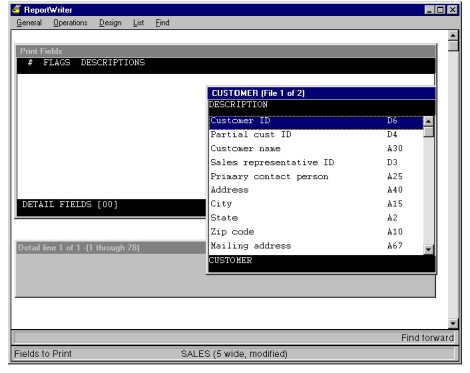
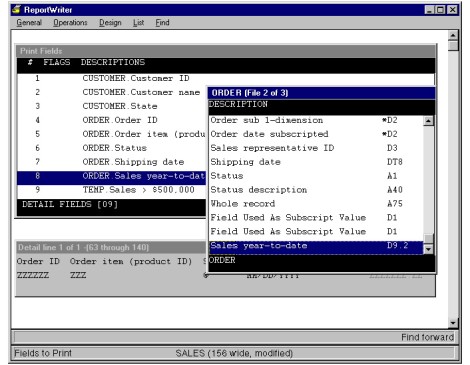
We’ll continue the example from the preceding section. If Customer master is our primary file, available fields might be customer ID, customer name, address, and so forth. Let’s say we decide to print the fields customer ID, customer name, sales representative, state, order ID number, order item, order status, shipping date, and sales year-to-date in our report. We also want to print a flag to mark sales figures that are $500,000 or more. (The example in Creating a text field explains how to define such a flag.) See figure 2.
| 4. | Press the Exit shortcut when you’re finished. |
|
|
Adding a single field
To add one additional field to an existing list of fields to print,
| 1. | Highlight the field in the Print Fields list immediately above where you want the new field to be placed. |
| 2. | Select Field functions > Add field. The list of available fields is displayed. |
| 3. | Select the field you want to include in your report. It is added below the highlighted field, and the list of available fields is closed. |
Adding multiple fields
To add more than one field to an existing list of fields to print,
| 1. | Highlight the field in the Print Fields list immediately above where you want the new fields to be placed. (They will be placed sequentially below the highlighted field. If you need to add new fields interspersed with existing fields, add them one at a time as described in Adding a single field above.) |
| 2. | Select Field functions > Add fields. The list of available fields is displayed. |
| 3. | Select a field you want to include in your report. The field is added below the highlighted field, the list of available fields remains on the screen, and the newly added field is highlighted. |
| 4. | Continue adding fields; when you’re done, press the Exit shortcut to close the list of available fields. |
Using multiple detail lines
If you’re creating a new report, the first detail record line is created automatically. You can add additional detail lines to each report record. A report record can have up to 10 detail lines.
| 1. | Select Line functions > Create new line. |
A new detail record line is inserted after the current line, a new Print Fields list is displayed for the new line, and the list of available fields is displayed so you can choose the fields to print. The layout window at the bottom of the screen now says “Detail line 2 of 2” (or whatever line number you’ve just created).
| 2. | Select the fields you’d like to print on the new detail line. |
If you exit without selecting any fields for the new line, it will be deleted. (If you simply want to create blank lines between records, see Specifying miscellaneous design options.)
Moving between detail lines
The Print Fields list contains the fields to print on the current line only. The layout window at the bottom of the screen also shows the layout of the current line only. All Fields to print operations apply only to the current line.
To move between lines, select Line functions > Next line or Line functions > Previous line. The line to which you’ve just moved becomes the current line.
Deleting a detail line
To delete the detail line that is currently displayed in the layout window, select Line functions > Delete current line. If the deleted line was not the last line, the line that followed it is now the current line. If the deleted line was the last line, the line that preceded it is now the current line.
