Editing a print field’s attributes
You can modify a field’s header, format, data justification, or format justification.
| 1. | Highlight the field in the Print Fields list and press Enter. |
|
|
| 2. | Modify the fields in the Print Field Attributes window as necessary. See the following sections for instructions: |
- Modifying a field header
- Modifying a field format
- Modifying data justification
- Modifying format justification
| 3. | When you’re finished making changes, exit the window. The new header and format are displayed in the layout window. |
Field headers are displayed at the top of each page in your report. The default field header is either the header that was specified when the field was defined in the repository or, for temporary fields, the description that you specified. (See Using Temporary Fields for more information.)
A field header can have a maximum of three lines. To begin a new header line, place a caret (^) in the header at the point where you want to split the line. If you want your header to contain an actual caret character, precede the caret with a backslash (\^). Two backslashes in a row (\\) cause a backslash character to be included in the header.
If no field header exists in ReportWriter or the repository, the header defaults to the field description. If the field does not have a description, the field name is used. Field headers for the current line are displayed in the layout window at the bottom of your screen.
|
|
If you have modified the page header, ReportWriter no longer updates the header automatically when the field header lines change, and you may not necessarily see the original header line for the current detail line. (See the note under Creating a page header.) |
If you want to replace the existing header completely, begin typing a new header at the Header prompt. To insert text in an existing header, use the arrow keys to position the cursor and then begin typing. To insert text at the beginning of the header, first press the Right Arrow key and then press the Left Arrow key before you begin typing; else, the entire header will be erased.
|
|
Once you’ve selected a field to print, any modifications you make to the field’s header affect only that selected field. If you select the same field again, its header defaults to the header specified in the repository or to the field description, if the field is a temporary field. |
Field formats define how data is redisplayed or reprinted in a report. For example, a telephone number is stored internally as 10 characters, but it can be redisplayed in your report as 12 characters (xxx/xxx-xxxx). By default, ReportWriter uses the format that was specified when the field was defined in the repository, but you can override that format in ReportWriter.
If a field has a format, it is displayed in the layout window at the bottom of the screen. If no format exists, ReportWriter assigns a default format. Refer to the table below.
|
Format character |
Meaning |
|---|---|
|
@ |
Alpha, user, and enumerated fields |
|
Z |
Numeric fields |
|
PP/YY |
4-byte date fields |
|
MM/DD/YY |
5- or 6-byte date fields |
|
PP/YYYY |
6-byte period date fields |
|
MM/DD/YYYY |
7- or 8-byte date fields |
|
24:MM |
4-byte time fields |
|
24:MM:SS |
6-byte time fields |
To replace the existing format, type a new format in the Format field or select Format functions > List selections to display a list of available formats from the repository. For date and time fields, the format list displays only those formats that are appropriate to the data type. You should always select from the format list for date and time fields.
See Appendix D: Data Formats for a more detailed explanation of data formatting characters.
|
|
For date and time fields, the formats in the format list are predefined by Repository and actually reorder the data being displayed. (For example, a date stored as YYMMDD can be displayed as MM/DD/YY.) If you enter your own format, ReportWriter treats the field as a normal decimal field and does not reorder the data. (See Appendix B: Date and Time Formats for a list of predefined display formats.) |
To insert text in an existing format, use the arrow keys to position the cursor and type your edits. To insert text at the beginning of the format, first press the Right Arrow key and then press the Left Arrow key before you begin typing; else, the entire format will be erased.
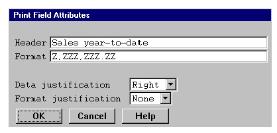
For example, we defined a dollar format for the Sales year-to-date field. The field is a D9.2 and will contain a monetary value, so we used the format Z,ZZZ,ZZZ.ZZ, as shown in figure 1.
|
|
Once you’ve selected a field to print, any modifications you make to the field’s format will only affect that selected field. If you select the same field again, its format defaults to the format specified in the repository or to the ReportWriter default format. |
Alpha data can be left-justified, right-justified, or centered. Numeric data must be right-justified. The data is justified within the field’s display range. The width of the display range is determined by either the field header or the field length, whichever is longer. (The field length is either the length of the format, if one exists, or the length of the field.)
Modifying format justification
You can specify whether the field’s format is left-justified or right-justified within the field before it’s applied to the data. In other words, if the format is too long, specifying Left at the Format justification prompt would cause it to be truncated on the right, while specifying Right would cause it to be truncated on the left. The default is none.
Modifying subscripting of an arrayed field
| 1. | Highlight the field in the Print Fields list. |
| 2. | Select Field functions > Change subscripting to display the Field Subscript window. |
| 3. | See Selecting an arrayed field for details on entering subscript information. |
Printing only part of a field (ranging)
Sometimes you will want to print only a portion of a field. You can do this by specifying the range of characters in a field that you want to print. If the a field is larger than 99 characters, you must specify ranging, and the Field Range window is displayed automatically.
| 1. | Highlight the field in the Print Fields list. |
| 2. | Select Field functions > Change ranging to display the Field Range window. |
| 3. | Enter the offset and length as instructed below. |
Offset
Enter the starting character position for the range within the field’s data size, or press the List selections shortcut to select a field to use as a variable offset (which is base one from field position one).
Length
Enter the length of the range within the field’s data size, or press the List selections shortcut to select a field to use as a variable length. The range length cannot exceed the maximum field size (99) or the result of the following operation:
field data size – offset + 1
| 4. | Exit the window. |
|
|
Once you’ve specified ranging for a field, you may change it from the dialog, but if you want to remove ranging completely, you must delete and reselect the field in your report. |
You cannot range a subscripted field. Instead, you must subscript within a calculation field, as shown below, and then range the calculation field.
CALC_FIELD = ARRAYED_FIELD[2]
Also, if you select an arrayed field as the offset or length, ReportWriter always uses the first element of the array (subscript = 1). To use an element other than the first, you must subscript within a calculation field and then select the calculation field at the Offset or Length prompt.
Deleting a field from a report
Highlight the field and select Field functions > Delete field. The fields in the Print Fields list are renumbered accordingly.
