You can specify headers and footers for pages of a report or the entire report. The headers/footers can include text and data fields. For example, you might want to include two question fields that specify a starting and ending date for your report (see Using a field in your header or footer for more information). You can also specify printing control information (such as suppressing the date and page number) for each header or footer with the Header/Footer Miscellaneous Attributes function.
| 1. | Select Design > Header/footer layout. |
The Layout functions menu is pulled down. It contains options for report headers and footers, page headers and footers, and miscellaneous header/footer attributes.
| 2. | Select the entry you want to define. A text editing window is displayed. |
Using the header/footer editing window
When you select a header/footer menu entry, a header/footer text editing window is displayed. There’s a ruler at the top of the window, so you can see the exact placement of each header or footer character. The window scrolls between 1 and 255 positions.
This window supports three input modes—command, insert, and overstrike:
- When you’re in command mode, you can use any of the menu entries.
- When you’re in insert mode, you can insert text in the text editing window. You cannot make selections from the menus.
- When you’re in overstrike mode, you can type over text in the text editing window. You cannot make selections from the menus.
If your terminal allows it, the cursor blinks when you’re in insert or overstrike mode, but not when you’re in command mode.
When the header/footer text editing window first displays, you are in command mode.
- To switch to insert mode, select Edit > Insert/overstrike mode (or press Ctrl+K). On Unix and OpenVMS, the word INSERT appears in the lower right corner of the editing window.
- To switch to overstrike mode, press Ctrl+K a second time. (Note that you cannot select Insert/overstrike mode again from the menu because you cannot make selections from the menu once you’re in insert mode.) On Unix and OpenVMS, the word OVERST appears in the lower right corner of the editing window.
- To return to command mode, press the Command mode shortcut, Ctrl+F.
Creating a report header
The report header appears at the beginning of your report. The default header is the name of the report, in uppercase letters. The report header can be up to 10 lines long; each line automatically scrolls to 255 columns.
|
|
If you’ve copied this report from another report, the default header is the name of the original report, not the current report. |
| 1. | Select Layout functions > Report header. |
The cursor is in the text editing window, and you’re in command mode.
| 2. | Select Edit > Insert/overstrike mode (or press Ctrl+K) to go to insert mode. (If you’d rather be in overstrike mode, press Ctrl+K while you’re in insert mode.) |
| 3. | Enter a new header for the report. |
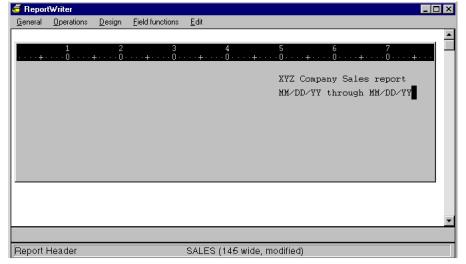
For example, we decided to print the header XYZ Company Sales Report on the first page of our report, with the dates covered in the report on the second line of the header. (See figure 1.)
| 4. | When you’ve finished editing the header, press Ctrl+F to return to command mode. |
| 5. | Press the Exit shortcut to close the header window and return to the Layout functions menu. |
|
|
Creating a report footer
The report footer appears at the end of your report. It can be up to 10 lines long; each line automatically scrolls to 255 columns.
| 1. | Select Layout functions > Report footer. |
The cursor is in the text editing window, and you’re in command mode.
| 2. | Select Edit > Insert/overstrike mode to go to insert mode. (If you’d rather be in overstrike mode, press Ctrl+K while you’re in insert mode.) |
| 3. | Enter a footer for the report. |
| 4. | When you’ve finished, press Ctrl+F to return to command mode. |
| 5. | Press the Exit shortcut to close the footer window and return to the Layout functions menu. |
Creating a page header
The page header appears at the top of each page of your report. The default page header is the field header line(s) for your report entries. The page header can be up to 10 lines long; each line automatically scrolls to 255 columns.
| 1. | Select Layout functions > Page header. |
The cursor is in the text editing window, and you’re in command mode. A data layout window is displayed at the bottom of the screen. If you’re creating a new report, the field header lines are displayed in the text editing window.
| 2. | Select Edit > Insert/overstrike mode to go to insert mode. (If you’d rather be in overstrike mode, press Ctrl+K while you’re in insert mode.) |
| 3. | Enter a new header to be used at the top of each page. |
To assist you in lining up your page header with your detail records, the last six lines of the screen display the layout of your report. The lines scroll upward or downward automatically when you move your cursor to a header line that was not previously visible in the layout window.
You can view the layout of the pre- and post-break lines by selecting Page header functions > Toggle data line/break lines. The first time you select it, the pre-break line layouts are displayed. The next time you select it, the post-break line layouts are displayed. To return to the detail record layout, select Toggle data line/break lines one more time. (For more information on break lines, see Creating a pre- or post-break line.)
| 4. | When you’ve finished, press Ctrl+F to return to command mode. |
| 5. | Press the Exit shortcut to close the page header window and return to the Layout functions menu. |
Creating a page footer
The page footer appears at the bottom of each page of your report. It can be up to 10 lines long; each line automatically scrolls to 255 columns.
| 1. | Select Layout functions > Page footer. |
The cursor is in the text editing window, and you’re in command mode.
| 2. | Select Edit > Insert/overstrike mode to go to insert mode. (If you’d rather be in overstrike mode, press Ctrl+K while you’re in insert mode.) |
| 3. | Enter a new footer for the page. |
| 4. | When you’ve finished, press Ctrl+F to return to command mode. |
| 5. | Press the Exit shortcut to close the page footer window and return to the Layout functions menu. |
Using a field in your header or footer
You can include a data field in the report or page header or footer you’re currently defining.
| 1. | In the header/footer editing window, move your cursor to the location where you want to insert the field. You cannot insert a field if your cursor is on a field. |
The field will be inserted beginning at the current cursor position and will overwrite any text currently in that space. Be careful to leave enough room for the field if you don’t want to overwrite existing text.
| 2. | Press Ctrl+F to return to command mode (if you’re not already in it). |
| 3. | Select Field functions > Add field. The list of available fields is displayed. |
|
|
| 4. | Select the field you want to include in your header or footer. The field is inserted (represented by its data format). |
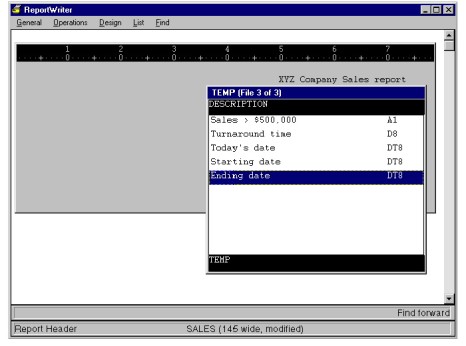
In the example in figure 2, we’ve inserted the Starting date field on the second line of the report header; gone into insert mode to type a space, followed by the word “through,” followed by another space; and are about to select Ending date from the list of available fields. (Starting date and Ending date are question fields that we define as an example in Creating a question field.)
|
|
Once you add, delete, or edit a field or assign a field conditional to your header or footer, you can no longer abandon your changes. |
Viewing a header or footer field
You can display a Print Fields list that contains the fields to be printed in the current header or footer.
| 1. | Select Field functions > Show field names. The Print Fields list is displayed at the bottom of your screen. |
Note: From this list, you can also change field attributes, subscripting, or ranging; specify a conditional; or add or delete a field.
| 2. | Press the Exit shortcut to close the Print Fields list. |
Changing a field’s attributes
You can change a field’s format or the way that format is justified within the field.
| 1. | Place the cursor anywhere within that field in the text editing window. |
| 2. | Select Field functions > Change field attributes. |
Note: You can also use the Show field names function to display the Print Fields list, highlight the field in the list, and press Enter.
The Print Field Attributes window is displayed.
| 3. | Enter data in each field as instructed below. |
Format
Enter a new display format for this field. You can either type a new format or select a format from a list of available formats using the List selections function.
Data justification
This value determines how data is justified within the field’s display range (the area between the field’s starting position and the adjusted field size). Select the justification you want for this field. Valid values are None, Left, Right.
Format justification
This value determines how the field’s format is justified within the field before it’s applied to the data. Select the format justification you want for this field. Valid values are None, Left, Right.
| 4. | Exit the window. |
Modifying subscripting of an arrayed header/footer field
| 1. | Place the cursor anywhere within the field in the text editing window. |
Note: You can also use the Show field names function to display the Print Fields list and highlight the field in the list.
| 2. | Select Field functions > Change subscripting to display the Field Subscript window. |
| 3. | See Selecting an arrayed field for details on entering subscript information for an arrayed field. |
Modifying ranging
You can specify that a range of characters in a header/footer field be printed, instead of the whole field.
| 1. | Place the cursor anywhere within the field in the text editing window. |
Note: You can also use the Show field names function to display the Print Fields list and highlight the field in the list.
| 2. | Select Field functions > Change ranging to display the Field Range window. |
| 3. | See Printing only part of a field (ranging) for details on entering ranging information for a field. |
Assigning a conditional to a header or footer field
You can connect up to five conditionals together (with AND and OR) and assign them to a field to print in a header or footer.
| 1. | Place the cursor anywhere within the field in the text editing window. |
Note: You can use the Show field names function to display the Print Fields list and highlight the field in the list.
| 2. | Select Field functions > Specify conditions. |
- If there are no conditions defined for the field, the list is empty and the Criterion Definition window is also displayed.
- If a condition has already been defined for this field, select Condition functions > Add condition to display the Criterion Definition window.
| 3. | See Assigning a conditional to a field for information on completing the fields. |
Deleting a header or footer field
| 1. | Select Field functions > Show field names. |
| 2. | Highlight the field in the Print Fields window. |
| 3. | Select Field functions > Delete field. |
Specifying header and footer attributes
You can specify the following header/footer attributes:
- Whether headers and footers are printed on the report
- The number of blanks lines between the headers and footers and the first or last report entry
- Whether the report header or footer is printed on a page by itself
- Whether the page number and the current date and time are included at the top of each report page (above the page header)
| 1. | Select Layout functions > Miscellaneous. |
Note: You cannot access this function while a header/footer editing window is displayed.
|
|
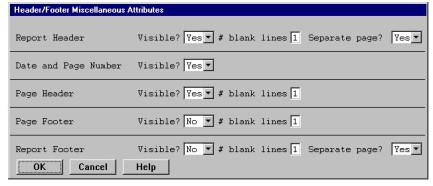
| 2. | In the Header/Footer Miscellaneous Attributes window, enter data in the fields as instructed below. |
Visible
Enter Yes if you want the specified header or footer and the page number and current date to be printed on each page. Enter No if you don’t want the header, footer, or page number and date printed. The default response is Yes for report headers, page headers, and the page number and date, and No for report and page footers.
We entered Yes for the report header, since we want it to be printed.
# of blank lines
Enter the number of blank lines that should separate the report header or footer from the rest of the report, the page header from the first report entry on each page, or the page footer from the last report entry on each page. The default is one line; the maximum is nine lines. (For report headers and footers, this number is meaningful only if you plan to answer No to the Separate page prompt.)
We ignored this field for the report header, because we’ll have it printed on a separate page.
Separate page
Enter Yes if you want to print the report header on a separate page at the start of the report or the report footer on a separate page at the end of the report. Enter No if you want the report header to appear on the first page of report entries or the report footer to appear on the last page of report entries. The default response is Yes. If you specify a separate page, the report header or footer is centered vertically on the page.
We entered Yes for the report header.
| 3. | When you’ve finished designing headers and footers, exit the window to return to the Layout functions menu. |
