Exercise four: Reading multiple files
This exercise shows how to create a report that uses data from more than one file. Our report will use data from two files: the open order file and the customer file.
Here’s the scenario: One of our suppliers tells us that he can’t deliver some one-gallon plants we have on order. We need to inform all customers who have open orders for this item so they can decide whether they want to order something else or wait for the supplier’s delivery.
We need to pull information from two files because part of the information we need (open orders for the item in question and customer number) is in the open order file, and part of the information (customer name, contact name, and phone number) is in the customer file.
Creating a new report
|
1.
|
Select Operations > Create new report, and name the report “PROBLEM OPEN ORDERS”. |
|
2.
|
Select Design > Files to read. |
|
3.
|
Select Open order file. |
Once you’ve selected the Open order file, you can select another file that’s associated with it.
|
4.
|
Select File functions > Add file. The file list displays only files that are associated with the Open order file. |
|
6.
|
Press the Exit shortcut. |
Selecting fields to print
|
1.
|
Select Design > Fields to print. |
|
2.
|
Press Tab to display fields from the Customer file. |
|
3.
|
Select Customer Name, Contact, and Telephone. |
|
4.
|
Press the Exit shortcut. |
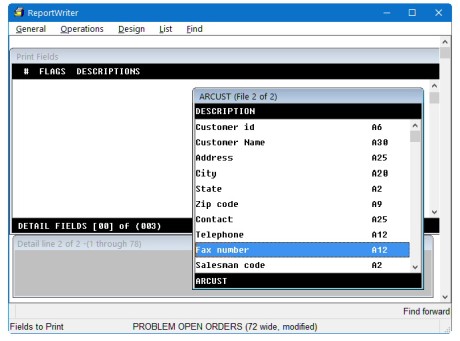
Before we select fields from the Open order file, we’ll create a new line on which to display those fields. We could create a report that’s wider than 80 columns, but creating a new line makes it easier to see the information on the screen.
|
5.
|
Select Line functions > Create new line. |
Note that the window at the bottom of the screen is now titled “Detail line 2 of 2,” and no fields are displayed, as shown in figure 1.
|
6.
|
Press Tab to switch back to the fields from the Open orders file. |
|
7.
|
Page down until “Description” appears in the list and select Description and Qty ordered. |
|
8.
|
Press the Exit shortcut two times. |
Defining the selection criterion
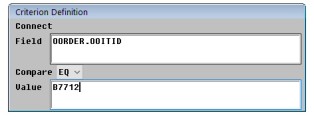
Now that the format of the report is defined, we need to indicate which item is on back order, so that we select only those customers who have placed an order for that item. The item that’s not available is item ID B7712.
|
1.
|
Select Design > Selections to make. |
|
2.
|
Press the List selections shortcut at the Field prompt. |
|
3.
|
Select Plitem id and press Enter. |
|
4.
|
Select EQ in the Compare field. |
|
5.
|
Enter B7712 in the Value field, as shown in figure 2. |
|
6.
|
Press the Exit shortcut. |
|
7.
|
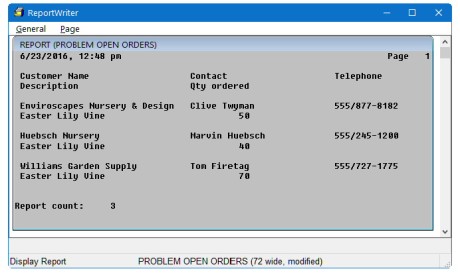
Press the Display report shortcut to view your report. You’ll notice that the information is a little too crowded to read easily. So let’s add a blank line or two between each selection. |
|
8.
|
Press the Exit shortcut to exit the report display. |
Adding a blank line between records
|
1.
|
Select Design > Miscellaneous. |
|
2.
|
In Lines per page field, press Enter. |
|
3.
|
In the Blank lines between records field, enter 1 and then press the Exit shortcut (or click OK). |
|
4.
|
Press the Display report shortcut to see how it looks with the additional spacing. |
|
5.
|
Press the Exit shortcut and select Operations > Save report. |
Summary
Go to Exercise five: Using calculation fields.