You can define a new field from scratch or by copying and modifying an existing field. If field definitions already exist, new definitions are inserted below the highlighted entry.
From the Field Definitions list,
- To define a field from scratch, select Field Functions > Add Field or Add Group (if you want to add a group field).
- To define a field by copying, highlight the field you want to copy, and then select Field Functions > Copy Field.
The Field Definition window displays with tabs on which you can define field information.
- Field Definition tab, for defining basic field information; see Basic field information.
- Display tab, for defining how you want the field to display in a Toolkit input window or ReportWriter report; see Display information.
- Input tab, for defining how field input is handled in a Toolkit input window; see Input information.
- Validation tab, for defining how field input is validated in a Toolkit input window; see Validation information.
- Method tab, for associating methods (that are called by Toolkit) with fields; see Method information.
- Long Desc tab, for assigning a long description to a field; see Assigning a long description to a field.
Basic field information
| 1. | Enter or modify data in each field as instructed below. |
|
|
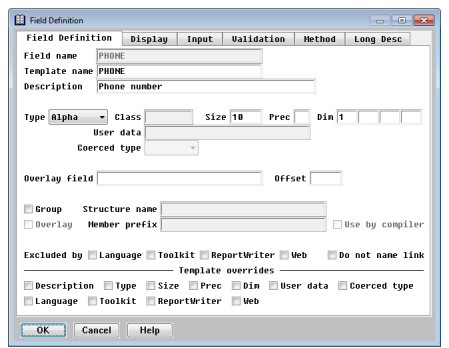
Field name
Enter a field name. The field name is used to identity the field in your definition file and program, and it is one of the ways the field is identified in ReportWriter. The field name must be unique within the current structure or group. (See Group for more information.) The field name can have a maximum of 30 characters and must begin with a letter. The remaining characters can be letters, digits, underscores (_), or dollar signs ($). See also Alt name.
If desired, enter the name of a template to use to create the specified field. Up to 6,000 fields can use the same template. To display a list of available templates, select Edit Field Functions > List Selections.
All attributes of the template are copied to the current field, including display, input, validation, and method information. You can override any of the template attributes simply by specifying new values. If the template is later modified, only the attributes that have not been overridden are copied to the field. The check boxes at the bottom of the window indicate the template attributes that have been overridden. If an attribute is checked, the value for that attribute has overridden the value that came from the template.
Repository sets the template override flags when you leave the Field Definition tab, but you can also set them manually. You might want to do this when an attribute matches the template and you don’t want it to be changed later if the template changes. By default, these fields are read-only. To modify them, select Edit Field Functions > Access Template Overrides. This menu entry is a toggle: select it a second time and the override fields revert to read-only. The Access Template Overrides setting remains in effect for all field and template definitions until you change it.
Description
Enter a description for the field, which a maximum of 40 characters. We recommend that you make the description unique because it can be used to identify fields in ReportWriter and Repository. The description also appears as the comment for the field when a definition file is generated by the Generate Definition File utility. In addition, if the structure that this field belongs to is included in an xfNetLink Java JAR file or xfNetLink .NET assembly, this description is included in the generated source code as a comment for the property or field.
Select the type of data the field will contain:
Alpha
Decimal
Integer
Date
Time
User
Binary
Boolean
Enum
Struct
AutoSeq
AutoTime
If you select Date, Time, or User, the cursor moves to the Class field. If you select Enum, the cursor moves to the Enumeration field (see Enumeration). If you select Struct, the cursor moves to the Structure field (see Structure).
|
|
In Synergy DBL, the Binary data type is treated as an alpha. In xfNetLink Java (when genjava is run with the -c 1.5 option) and xfNetLink .NET. a Binary data type field in a structure is converted to a byte array on the client, and can be used, for example, to store an RFA. For xfNetLink Synergy clients, a Binary data type field is converted to a string. In xfODBC, a Binary data type field is described as a binary field (SQL_BINARY). This is also true of a User type field with a class of binary (see Class below), but in this case you can use the routines for user-defined data types in xfODBC to manipulate the data read from the ISAM file and return it as a binary field to the ODBC-enabled application. |
If you selected Date or Time in the Type field, specify the storage format in the Class field:
- Date fields
YYMMDD = two-digit year, month, day
YYYYMMDD = four-digit year, month, day
YYJJJ = two-digit year, Julian day
YYYYJJJ = four-digit year, Julian day
YYPP = two-digit year, period
YYYYPP = four-digit year, period
- Time fields
HHMM = hour, minute
HHMMSS = hour, minute, second
If you selected User in the Type field, specify the user subtype in the Class field. User subtypes are used by the xfODBC user-defined processing routines and are available in the gs_inpfld structure within UI Toolkit’s user-defined processing routines. Subtypes also affect data type mapping for xfNetLink Java and xfNetLink .NET; see Appendix B: Data Type Mapping for xfNetLink Java or Appendix C: Data Type Mapping for xfNetLink .NET. The available subtypes are
Alpha
Numeric
Date
Binary
Additional date storage formats are supported by xfODBC. See Appendix B: Date and Time Formats for more information. See the note above for information on the binary subtype.
User data
If you selected User in the Type field, specify a string of up to 30 characters to identify your user-defined data type.
In a UI Toolkit input window, a user type field flags the runtime input processor to call the ECHKFLD_METHOD, EDSPFLD_METHOD, and EEDTDSP_METHOD subroutines for additional processing. The user data string is passed to these subroutines to be used as a control code. The user subtype (class) is available in the gs_inpfld structure.
User type fields also flag ReportWriter to call a user-overloadable subroutine (for example, RPS_DATA_METHOD, which formats the data for display). See Customizing ReportWriter Routines for more information about the user-overloadable subroutines called by ReportWriter.
User type fields also flag xfODBC to call user-overloadable subroutines to process the data for those fields. The user data string is passed to these routines. See Creating Routines for User-Defined Data Types for more information.
To save your user data string, press Enter.
If you selected Enum in the Type field, enter the enumeration name or select Edit Field Functions > List Selections and choose it from the list.
|
|
The Enum data type is not supported by UI Toolkit. To use an enumerated data field with an allow list or selection list or window, use the Enumerated field as described in Enumerated. |
If you selected Struct in the Type field, enter the structure (or alias) name or select Edit Field Functions > List Selections and choose it from the list. If you use the list, note that aliases are listed at the bottom, after the real structure names. See the note under Group for an explanation of the difference between referencing a structure as a Struct data type vs. as an implicit group.
Coerced type
If the structure that this field belongs to is included in an xfNetLink Java JAR file or an xfNetLink .NET assembly, you can optionally specify a non-default data type for the field to be coerced to on the client side. Type coercion is available when Type is one of the following: Decimal, Integer, Date, Time, User.
- For Decimal (with or without precision) and Integer types, select Default to use the default xfNetLink type mapping.
- Date types can be coerced when the format is one of the following: YYMMDD, YYYYMMDD, YYJJJ, YYYYJJJ.
- User types can be coerced only when the user subtype (i.e., the Class field) is Date and the User data field contains ^CLASS^=YYYYMMDDHHMISS or ^CLASS^=YYYYMMDDHHMISSUUUUUU (case sensitive).
- For Date, Time, and User types, the default coerced type is DateTime.
See Appendix B: Data Type Mapping for xfNetLink Java and Appendix C: Data Type Mapping for xfNetLink .NET for more information on data type mapping and coercion in xfNetLink.
Size
Enter the maximum number of characters the field can contain. The following restrictions apply:
- The maximum size of an alpha, binary, or user field is 99,999.
- The maximum size of an implied-decimal field is 28.
- Valid sizes for integer fields are 1, 2, 4, and 8.
- If the data type is date or time, the size is automatically set when you select a storage format and cannot be modified.
- If the data type is Boolean or Enum, the size is automatically set to 4 and cannot be modified.
- If the data type is Struct, the size is automatically set when you select the structure name.
- If the data type is AutoSeq or AutoTime, the size is automatically set to 8 and cannot be modified.
- The size of a group field is optional.
Precision
If the field is implied-decimal, enter the number of characters to the right of the decimal point. This value must be between 1 and 28, inclusive, and must be less than or equal to the size of the field.
Dim1 – 4
If the field is an array, enter the number of elements in each dimension. The maximum number of dimensions is 4. The maximum number of elements per dimension is 999.
Overlay field
If the field is an overlay to another field or fields, enter the name of the overlaid field at which the overlay begins or select Edit Field Functions > List Selections and choose it from the list. The overlaid field must be a field that precedes the current field. For example, the year, month, and day might be overlays for a date field.
If you want the overlay to begin at an offset position, enter the number that should be added to the starting position of the field being overlaid (as specified by Overlay field above). The default offset is 0.
For example, if you wanted to overlay the DATE field, you would enter “DATE” in the Overlay field, and your overlay offset might be 0 for the year, 4 for the month, and 6 for the day. This would make the year start at position 1 (0 added to a starting position of 1 equals 1), the month start at position 5, and the day start at position 7.
Select this field to indicate the field is a group. Group is set by default if you selected Add Group when on the Field Definitions list.
There are two types of groups: explicit and implicit. An explicit group is one whose members are defined explicitly within the Field Definitions list. An implicit group is one whose members are defined implicitly by referencing another structure. The members of that structure define the members of the group. To define an implicit group, see the Structure name field below.
|
|
You can reference a structure as a field either as an implicit group or as a Struct data type. In both cases, you are required to enter the structure name and the field is maintained as a reference to that structure. Any modifications made to a referenced structure affect all fields that reference it. The difference between the two is that a structure referenced as an implicit group is represented as a group in your Synergy code and in definition files; it uses the group keyword and you will see the group members (fields) listed. In contrast, a structure referenced as a Struct data type is represented as a structfield in code and definition files. That is, the data type of the field is the name of the referenced structure and you do not see the members listed. (See structure for more information on structfields.) You can specify a structure by its alias when referencing a structure as a structfield, but not when referencing it as an implicit group. In Toolkit, xfODBC, and xfNetLink, a Struct data type is treated the same as an implicit group. |
After setting the Group field, select Edit Field Functions > Edit Group Members to define explicit group members. (On Windows, you can also click the drilldown button.) This displays another Field Definitions list in which you can define the group members. See Modifying group members for more information about defining and modifying groups and for the rules regarding groups.
If Size is not specified for a group field, its size is determined by the size of its members.
Overlay
If the field is a Group, select this field if you want the group to overlay the last non-overlay field or group.
To specify an implicit group (see the Group field above), enter the structure name in this field or select Edit Field Functions > List Selections and choose it from the list.
Once you have entered a structure name in this field, you can select Edit Field Functions > Edit Group Members to view the members of the group. (On Windows, you can also click on the drilldown button to the left of the Structure name field.) Implicit groups are maintained as a reference to a structure; therefore, the list of members is read-only. The members are not copied into the group definition. See also the note above.
If explicit group members exist, the Structure name field is disabled. To change a group from explicit to implicit, you must first delete all explicit group members.
Member prefix
If Group is set, you can specify an optional prefix to be added to group member names when they are accessed by Toolkit and xfODBC. The member prefix name must begin with a letter. The remaining characters can be letters, digits, underscores (_), or dollar signs ($).
In Repository and Synergy DBL, field (and group) names have to be unique only within their parent. In DBL, path specifications can be used to uniquely reference group members. UI Toolkit and xfODBC, however, do not have a way to uniquely identify group members. The Member prefix field enables you to construct unique field names for Toolkit and xfODBC access. (Repository does no validation to ensure that the specified prefix is sufficient for unique field access.)
Set this option to indicate that the Member prefix specified will be added to all group member fields when referenced by the Synergy compiler. This optional behavior enables you to use consistent names throughout your Synergy and UI Toolkit programs.
This value determines whether a field is available to the Synergy compiler. Select this option if you do not want the field to be available to the compiler. Excluded by Language is cleared by default, which means the field will be included when using the .INCLUDE compiler directive to reference the structure to which this field belongs, and will be included in any definition files generated by the Generate Definition File utility. This feature is useful when your repository contains overlay fields defined solely for the purpose of referencing group elements from within ReportWriter.
Excluded by Toolkit
This value determines whether a field is available to UI Toolkit. Select this option if you do not want to be able to reference the field from Toolkit. Excluded by Toolkit is cleared by default, which means the field can be referenced by the Script compiler, Composer, and the IB_FIELD subroutine.
This value determines whether a field is available in ReportWriter as a selectable field. Select this option if you do not want this field to be selectable in ReportWriter. Excluded by ReportWriter is cleared by default, which means the field can be selected for inclusion in a report. This flag can also be honored when generating a system catalog in xfODBC; see Setting catalog generation options for details on including and omitting fields.
Excluded by Web
This value determines how the field is treated by xfNetLink. The Excluded by Web flag should be used only to control how fields in an overlay are handled. If this field is not part of a structure that contains overlays, do not select this option. Select Excluded by Web if you do not want this template field to be included in a Synergy JAR file or assembly. Excluded by Web is cleared by default, which means that all fields are included in the Synergy component. For details on using this flag to control how overlays are handled, see How overlays are handled.
ReportWriter can use name links you establish in Repository to access related files. The value in this field determines whether the field is name linked to its template (if one exists). By default, Repository will use the name of the template to generate name links. Select this field is you want Repository to use the field’s name when generating name links. (See also Generate Cross-Reference utility (rpsxref).)
If the current field references a template, the Template overrides section indicates the template attributes that are overridden. If these fields are read-only, select Edit Field Functions > Access Template Overrides to make them active. (See the description of Parent template for more information about template override flags.)
| 2. | To define display, input, validation, or method information, or to assign a long description to the field, go to the desired tab or select the entry from the Field Functions menu. Refer to the following sections for instructions: |
Assigning a long description to a field (Long Desc tab)
| 3. | When you have finished defining the field, exit the window to save the new field definition and return to the Field Definitions list. |
When you exit, Repository validates the display, input, validation, and method information. If an error exists, correct it and then exit the window again.
The new field definition is highlighted in the field list, and the number of fields displayed at the bottom of the list is updated. The SIZE field at the bottom of the window is updated to reflect the new size of the structure.
If the field being modified has group members, but the Group field is not set, before returning to the Field Definitions list, you are prompted
Field “NAME” is a group. Clearing the “Group” field will delete all group members. Do you want to continue?
If you select Yes, the group members are not saved with the field definition. If you select No, you are returned to the Field Definition tab.
Display information
The Display tab enables you to define how you want the field to display in a Toolkit input window or ReportWriter report.
When the Toolkit script compiler accesses a field in the repository, the default is to use all display information stored with that field. However, you can still use .FIELD qualifiers in your script file to override one or more of the repository attributes. (A field’s type, size, precision, and dimensional data cannot be overridden.) For more information on the use of these script qualifiers, see .FIELD.
| 1. | From the input window where you’re defining the new field or template, go to the Display tab or select Edit Field Functions > Edit Display Information or Edit Template Functions > Edit Display Information. (If you’re in the Field Definitions or Template Definitions list instead of an input window, select Field Functions > Edit Display Information or Template Functions > Edit Display Information.) (See figure 2.) |
|
|
If the current field or template uses a global format that no longer exists, a warning message is displayed. You must select another format, or no format, at the Format name prompt before your modifications can be validated. |
| 2. | Enter or modify data as instructed below. The name of the field or template cannot be modified. |
|
|
If you are defining display information for a template, any references to “fields” in the remainder of this section refer to fields that use the current template. |
|
|
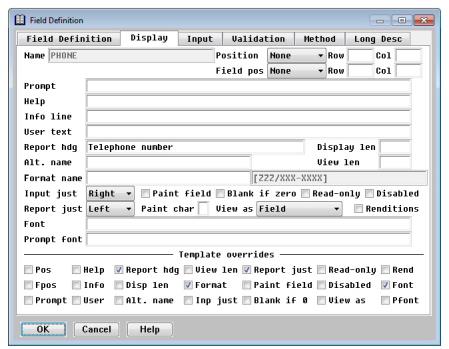
Position
This value specifies whether a position is associated with this input window field and, if so, whether the position is absolute or relative. Select the position:
None = No position is associated with the field. (default)
Absolute = Designates a specific position.
Relative = Specifies the number of rows and columns that the current position will change.
If you select None, the Row and Col fields are cleared, and the cursor moves to the Field pos field.
If a prompt is defined for this field, the prompt begins at the specified position. If no prompt is defined, the input field itself begins at the specified position. If no position is specified, the position of the prompt defaults to one column past the last position used in the window.
Row
If you selected a position of Absolute, specify the row position. If you selected a position of Relative, specify the number of rows that the current position will move. This relative movement value can be positive or negative.
Col
If you selected a position of Absolute, specify the column position. If you selected a position of Relative, specify the number of columns that the current position will move. This relative movement value can be positive or negative.
Field pos
The field position specifies the position of a field independent of its prompt. If no field position is specified, the position of the field defaults to the position of any prompt, with the length of the prompt added to the column position. Select a field position:
None = No position is associated with the field. (default)
Absolute = The row and column values are the absolute coordinates for the field relative to the input window.
Relative = The row and column values specify a change from the last position occupied. If you’ve specified a prompt, the change is relative to the prompt position.
If you select None, the following Row and Col fields are cleared and the cursor moves to the Prompt field.
Row
If you selected a position of Absolute, specify the row position. If you selected a position of Relative, specify the number of rows that the current position will move. This relative movement value can be positive or negative.
Col
If you selected a position of Absolute, specify the column position. If you selected a position of Relative, specify the number of columns that the current position will move. This relative movement value can be positive or negative.
|
|
In the next four fields (Prompt, Help, Info line, and User text), you can enter only a 60-character text string, although the maximum string length is 80 characters. To enter a longer string, select Edit Field Functions > Edit Entire Text. If you later need to edit a string that exceeds 60 characters, you must do it using the Edit Entire Text function. (If you edit it in the field, the portion that is not displayed will be lost. Similarly, deleting the 60 characters that are displayed in the field will delete the entire string.) |
Prompt
Specify a fixed or variable prompt. A fixed prompt is a string that is displayed in the input window to prompt the user for input. The prompt string must include any spacing that you want between the prompt and the input. If the prompt string contains trailing spaces, or if you want to use only digits in the prompt string, enclose the string in quotation marks.
To specify a variable prompt enter a numeric value without quotation marks. This value is used by the Toolkit I_PROMPT subroutine as the length of the variable prompt supplied to it.
Help
Specify a help identifier. The help identifier is passed as an argument to the Toolkit EHELP_METHOD subroutine.
Info line
Specify a text string that will display on the information line when input is being processed for this field. Information line strings that contain trailing spaces must be enclosed in quotation marks. When processing an input window, if you don’t specify an information line string, the previous information line remains in effect. If new information line text is displayed, the information line reverts to the text it contained previously once field input occurs.
User text
Specify a user-defined text string associated with this input field, if desired. The size of the user field data is fixed by the size of the string used during the input window’s compilation; writing data out to the string won’t change the size of the string. You can access this string at runtime with the Toolkit I_USER subroutine. User text strings that contain trailing spaces must be enclosed in quotation marks.
Report hdg
Enter text to be used as the column heading in ReportWriter, if desired, and press Enter. Maximum size is 40 characters.
This field is used as the column heading by ReportWriter. If no heading exists, ReportWriter uses the field description as a column heading. If no description exists, ReportWriter uses the field name. Note the following:
- If you modify the heading in an existing field definition, it does not affect a field that has already been selected for printing in existing ReportWriter reports. However, it does affect any new selections of that field for inclusion in a report.
- If you want the heading to be split into multiple lines when it is printed, insert a caret character (^) into the heading string to designate a line break. You can include up to two carets, for a total of three heading lines. If you want the heading to contain an actual caret character, precede the caret with a backslash (\). Two backslashes in a row cause a backslash character to be printed in the heading.
The Report hdg field is also used by xfNetLink .NET when this structure is included as a DataTable class in a Synergy assembly. The value in this field is used for the column caption in the DataTable. If no heading exists, the field name is used as the column caption. For more information, see Using DataTables.
Display len
Enter the maximum number of characters that you want to be displayed in the field. This value overrides the default display length computed by UI Toolkit. Valid values are 0 through 65,535.
Display length cannot be specified if the “View as” field is set to Radio buttons or Check box, or the Selections field (on the Validation tab) is set to Window or List, or if the field is a text field (a multi-dimensional alpha field).
Enter an alternate name to be used instead of the field name. The alternate name can have a maximum of 30 characters and must begin with a letter. The remaining characters can be letters, digits, underscores (_), or dollar signs ($).
In xfODBC, the value in this field can be used for the column name for the field in the ODBC system catalog; if no alternate name is specified, the field name is used as the ODBC column name. See Renaming columns for clarity (SODBC_ODBCNAME) for more information.
In xfNetLink Java and xfNetLink .NET, this value can be used for the property name in the Java class or C# class; if no alternate name is specified, the field name is used as the property name. See Passing structures as parameters for details.
View len
Enter the number of characters that you want to use to determine the width of the field on the screen (i.e., the width of the area on the screen that will display data for the field). This value overrides the default width as determined by Toolkit. Valid values are 0 through 9,999. View length cannot be specified if the “View as” field is set to Radio buttons or Check box.
On Windows, this value is multiplied by the width of the sizing character for the current font to determine the field width. If view length is less than display length, the field will be scrollable up to the display length. On Unix and OpenVMS, the width of the field is set to the number of characters specified. If view length is less than display length, the field will be truncated to fit in the view length.
Format name
If you want this field to be associated with a format, enter the name of an existing format. If a format was previously assigned to this field or template, its name is displayed, with the actual format displayed next to it. To display a list of available formats, select Edit Field Functions > List Selections or Edit Template Functions > List Selections. See Defining field formats for details on the format feature.
Input just
Select the justification for the text in the field when this field is used in a Toolkit input window: Left, Right, or Center.
Left is the default for alpha, date, time, and user type fields. Right is the default for decimal, implied-decimal, and integer fields, but is not valid for text fields (multi-dimensional alpha fields). Center is not valid for numeric or text fields (multi-dimensional alpha fields).
Report just
Select the justification for the data within the column when this field is used in a ReportWriter report. The default is left-justified for alpha, user, date, and time fields and right-justified for decimal, implied-decimal, and integer fields. Center-justification is allowed only for alpha and user fields.
The width of the column in which the data will be justified is determined by either the column heading or the field length, depending on which is longer. (The field length is either the length of the format, if one exists, or the length of the field.)
Paint field
Set this field to indicate that the specified paint character (or blanks) are used to “paint” the empty field where the user types input. If Paint field is not set, any paint character specified for the input window will be used.
If you set the Paint field, you can optionally specify a display character to “paint” the empty field to indicate where the user types input. Repository does not have a default paint character.
Blank if zero
If Set this field to indicate that a decimal, implied-decimal, or integer field should remain blank when the user enters a value of 0.
Set this field to indicate that the field is read-only. Unlike a disabled field, a read-only field can receive focus. Read-only can be set only when View as is set to Field (see below). If the data type is AutoSeq or AutoTime, the Read-only flag is set automatically, as these data types are always read-only.
The Read-only field is honored by xfNetLink Java and xfNetLink .NET when the structure is included in a JAR file or assembly. For xfNetLink Java, you must use the genjava -ro option to indicate that you want the read-only flag honored. For xfNetLink .NET, you must choose to generate structure members as properties rather than fields for the read-only flag to take effect. Properties that are flagged as read-only will have a “get” method, but no “set” method.
Disabled
Set this field to indicate that the field is disabled and cannot receive focus.
View as
Select how you want the field displayed in the input window:
Field = Display as a standard input field. (default) To display the field as a selection list field, define an associated selection list or window.
Radio buttons = Display as a set of radio buttons on Windows. On Unix and OpenVMS, display as a selection list field. This option is allowed only if the field has an associated selection list or window.
Check box = Display as a check box on Windows. On Unix and OpenVMS, display as a one-character field (“X” if non-zero, or space if zero). This option is allowed only when the field’s data type is decimal, implied-decimal, or integer. Since a check box is implicitly an enumerated field, you cannot select Check box when the Enumerated value is Yes.
See Validation information for more information on defining selection lists and windows.
Set this option to define a color palette number and one or more attributes for the field. By default, an input field inherits its renditions from the input window to which it belongs. To override the window’s color or attributes, click on Renditions or press the spacebar. When you select this field, a pop-up window displays the following fields:
Color = Enter a color palette number between 1 and 16 (inclusive) to associate with the field. This overrides any color specified for the input window.
Attributes = Select this option to override the input window’s attributes for the field. All four attributes will override the corresponding input window attributes. When Attributes is set, the other four check boxes are enabled.
Highlight = If set, the input field will be highlighted.
Reverse = If set, the input field will be in reverse video.
Blink = If set, the input field will blink (on Windows, it displays in italic typeface).
Underline = If set, the input field will be underlined.
Exit the window to save the rendition modifications and return to the Display tab.
Font
Enter the name of the font to use for displaying the contents of the input field on Windows. This name must be defined in the font palette (specified in the [FONTS] section of the synergy.ini or synuser.ini file).
Prompt font
Enter the name of the font to use for displaying the input field prompt on Windows. This name must be defined in the font palette (specified in the [FONTS] section of the synergy.ini or synuser.ini file).
The font names in the Font and Prompt font fields can each have a maximum of 60 characters and must begin with a letter. The remaining characters can be letters, digits, underscores (_), or dollar signs ($).
Template overrides
If the current field references a template, this section indicates the template attributes that are overridden. If these fields are read-only, select Edit Field Functions > Access Template Overrides to make them active. (See the description of Parent template for more information about template override flags.)
| 3. | Continue to define field information on the other tabs or, if you are finished defining the field, exit the window to save the field definition and return to the Field Definitions list. |
Input information
The Input tab enables you to define how you want field input to be handled when the field is used in Toolkit input windows.
When the Toolkit script compiler accesses a field in the repository, the default is to use all input information stored with that field. However, you can still use .FIELD qualifiers in your script file to override one or more of the repository attributes. (A field’s type, size, precision, and dimensional data cannot be overridden.) For more information on the use of these script qualifiers, see .FIELD.
| 1. | From the input window where you’re defining the new field or template, go to the Input tab or select Edit Field Functions > Edit Input Information or Edit Template Functions > Edit Input Information. (If you’re in the Field Definitions or Template Definitions list instead of an input window, select Field Functions > Edit Input Information or Template Functions > Edit Input Information.) (See figure 3.) |
| 2. | Enter or modify data as instructed below. The name of the field or template cannot be modified. |
|
|
If you are defining input information for a template, any references to “fields” in the remainder of this section refer to fields that use the current template. |
|
|
Uppercase
If Uppercase is set, lowercase input characters are converted to uppercase on alpha and user type fields. All input is displayed in uppercase. Uppercase can be set only when the field’s data type is alpha or user. Note that only input is uppercased; if your program loads data directly into this field, you must uppercase that data manually.
Nodecimal
If Nodecimal is set, the user does not need to type a decimal point when placing input in a numeric field. The input is stored right-justified, with the number of decimal places inferred from the storage format. An explicit decimal point overrides the Nodecimal value. For example, an entry of 12.34 always yields a result of 12.34, regardless of whether Nodecimal is set. Nodecimal can be set only when the field’s data type is decimal, implied-decimal, or integer.
Noterm
If Noterm is set, the field is automatically terminated when filled. Field input is normally terminated only when you press Enter; if a field is filled and the user tries to enter more characters, the terminal bell rings for each extra character typed. However, when you set Noterm, the field is automatically terminated when the field is filled. (In other words, the user doesn’t have to press Enter.)
Retain position
If Retain position is set, the position within the text field is to be retained on subsequent re-entry to the field, until the field is reinitialized or redisplayed. This field is valid only for text fields (multi-dimensional alpha fields).
The Action value determines whether a default value should be displayed in the field or whether a default action should occur. Select an option:
None = No default action occurs. (default) The Automatic field (see below) is set to No and the cursor moves to the Date (today) field.
Default = The specified default value is displayed in the input field. A second window in which you can enter a default value for the input window field is displayed. (See the description of the Default value field below.)
Copy = Copies the value from the data area that corresponds to this field (as defined by the structure) if the field is empty.
Increment = If the user does not enter a value the first time a decimal, implied-decimal, or integer field is processed, the last value in the field plus one is used.
Decrement = If the user does not enter a value the first time a decimal, implied-decimal, or integer field is processed, the last value in the field minus one is used.
If you selected Default in the Action field, an input window is displayed so you can enter a default value for the field. Enter a default value that will be automatically displayed in the field and press the Enter key. The user can accept the default by pressing Enter, edit the default, or type a new value. For date and time fields, the default value must be specified in storage form (Class), rather than input or display form. For example, to specify “January 31, 1999” as the default value for a date stored in YYYYMMDD form, you would specify “19990131”.
If set, the default action specified in the Action field — Default, Copy, Increment, or Decrement — occurs automatically when an empty field is processed. Automatic can be set only when you’ve specified a default action.
Date (today)
If set, Date (today) defaults the date to today’s date if the user presses Enter without entering anything in a blank date field.
Date (short)
If set, Date (short) displays a date type field in fewer than the normal 11 characters. A short period date (a date type field with a storage format of YYPP or YYYYPP) has a display length of five characters. All other short dates have a display length of eight characters.
Time (now)
If set, Time (now) causes the time to default to the current system time if the user presses Enter without entering anything in a blank time field.
Time (ampm)
If set, Time (ampm) specifies that the display format of a time field is 12-hour time, followed by an AM or PM indicator.
Set Noecho to prevent the text that the user types from being displayed in the field (such as for a password field). If you want, you can specify a character to be displayed for each typed character. (See the Noecho character field, below.) Noecho can be set only if the field’s data type is alpha or user.
If you set Noecho and the field’s data type is alpha or user, you can optionally specify a display character to be displayed for every character of input the user types. The display character also fills any remaining spaces at the end of the input after the user presses Enter, so other users can’t see how many characters were entered.
Wait
The Wait value specifies whether a time-out will occur if the user doesn’t complete input in an allotted amount of time. Any Wait value overrides the value in the Toolkit g_wait_time field. Select a Wait option:
None = No wait specified. The Toolkit g_wait_time field defines the global wait time. (default)
Wait time = Toolkit should wait the specified number of seconds for input processing to complete.
Immediate = Immediate user response is required; do not wait.
Global = The global wait time (defined by the Toolkit g_wait_time field) should be used.
Forever = Designates that Toolkit should wait until input processing is complete.
Wait time
If you selected Wait time in the Wait field, enter the number of seconds to wait for input processing to be complete.
Enter the maximum number of characters you want the user to be able to enter in the field. This value overrides the default input length computed by Toolkit. Valid values are 0 through 65,535.
Input length cannot be specified if the “View as” field (on the Display tab) is set to Radio buttons or Check box, or the Selections field (on the Validation tab) is set to Window or List, or if the field is a text field (a multi-dimensional alpha field).
Template overrides
If the current field references a template, the Template overrides section indicates the template attributes that are overridden. If these fields are read-only, select Edit Field Functions > Access Template Overrides to make them active. (See the description of Parent template for more information about template override flags.)
| 3. | Continue to define field information on the other tabs or, if you are finished defining the field, exit the window to save the field definition and return to the Field Definitions list. |
Validation information
Validation information is the data associated with a field or template that affects how field input is validated when the field is used in Toolkit input windows.
When the Toolkit script compiler accesses a field in the repository, the default is to use all validation information stored with that field. However, you can still use .FIELD qualifiers in your script file to override one or more of the repository attributes. (A field’s type, size, precision, and dimensional data cannot be overridden.)
| 1. | From the input window where you’re defining the new field or template, go to the Validation tab or select Edit Field Functions > Edit Validation Information or Edit Template Functions > Edit Validation Information. (If you’re in the Field Definitions or Template Definitions list instead of an input window, select Field Functions > Edit Validation Information or Template Functions > Edit Validation Information.) |
| 2. | Enter or modify data as instructed below. The name of the field or template cannot be modified. |
|
|
If you are defining validation information for a template, any references to “fields” in the remainder of this section refer to fields that use the current template. |
|
|
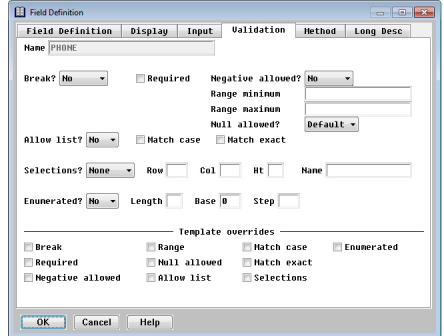
Break
Break triggers a break in input set processing on a field. Sometimes you’ll want to interrupt input set processing on a field, perform external operations, and then continue with the input set. Select a break option:
No = No break occurs. (default)
Yes = A break occurs after input to this field has been processed (that is, whenever the field’s data changes).
Always = A break always occurs, regardless of whether input has been processed (for example, even if the field is accessed via the I_NEXT/I_PREV menu entries).
Return = A break occurs when you press Enter, but not when the field is accessed via the I_NEXT/I_PREV menu entries.
Required
Set this option to indicate that a non-blank alpha or non-zero numeric entry is required in the field.
Negative allowed
The value in this field determines whether negative values are allowed on decimal and implied-decimal fields. Select an option:
No = Negative numbers are not allowed as input. (default)
Yes = Negative numbers are allowed as input. The user can place a negative or minus sign (–) either before or after a number. The size of the input field is one character larger than the size of the data field.
Only = Only negative numbers are allowed as input.
OrZero = Only negative numbers or 0 are allowed as input.
You can specify a range of values for decimal, implied-decimal, integer, date, and time fields. Enter the minimum value for the range in this field. The range minimum must be less than or equal to the range maximum. You cannot specify a range value in conjunction with an allow list or a selection list or window. For date and time fields, Range minimum and Range maximum must be specified in storage form (Class), rather than input or display form. For example, to specify “June 1, 1900” as the range minimum for a date stored in YYYYMMDD form, you would specify “19000601”.
Range maximum
If you are specifying a range of values for the field, enter the maximum value for the range in this field. The range maximum must be greater than or equal to the range minimum. See the Range minimum field above for more information.
Null allowed
This field indicates whether a field can be null. It is used by xfODBC to determine the null property for the column in the system catalog. If the data type is AutoSeq or AutoTime, this field is set to No. For details see Preventing null updates and interpreting spaces, zeros, and null values.
Allow list
An allow list specifies the valid entries for the field. Set this value to Yes if the field has a list of valid entries associated with it; the default is No. If you select Yes, you may also want to select Match case and/or Match exact; see below for details.
If you select Yes for Allow list, a window will display in which you can enter the list entries. See Allow List/Selection List Entry below for instructions. If you select No, the cursor moves to the Selections field. You cannot specify an allow list in conjunction with selection lists or with the Noecho attribute.
Allow List/Selection List Entry
If you selected Yes in the Allow list field, specify the entries that you want to appear in the Allow List/Selection List Entry window. You can enter a maximum of 99, each with a maximum length of 80 characters. The entry input window displays the entry number to the left of the data entry field. Type the entry text in the field, then select Edit Field Functions > Edit Next Entry or Edit Template Functions > Edit Next Entry (or press Ctrl+L for either fields or templates) to enter another entry. To edit the previous entry, select Edit Previous Entry. To define blanks as an allowable entry, you must enclose them in quotation marks (for example, “ ”).
If your entry in the Allow List/Selection List Entry window is longer than 40 characters, it will wrap. When a word wraps to the second line, it may leave several spaces at the end of the first line. These spaces will become part of the allow list entry. To avoid these unwanted spaces in the entry, when you reach the end of the first line, type a space, and then continue typing the word on the second line. (The space you type at the end of the line only serves to break the word in the Allow List/Selection List Entry window; it will not become part of the allow list entry.)
When you have finished specifying allowable entries, press the Exit shortcut. If this is an alpha or user field, the cursor moves to the Match case field. If this is not an alpha or user field, the cursor moves to the Selections field.
Match case
If you selected Yes in the Allow list field, select Match case to specify that the value in an alpha or user field must match the case of a specified allowable entry. For example, the entry “no” matches with “no,” but it does not match with “NO” or “No.” If Uppercase is set (on the Input tab), Match case is ignored. Match case can be set only when the field’s data type is alpha or user.
Match exact
If you selected Yes in the Allow list field and the field’s data type is alpha or user, select Match exact to specify that the alpha or user field input must match all characters in the specified allowable entry. If Match exact is not set, Toolkit utilities look for a match based on the shortest string. For example, if you are looking for a match with “Ann,” the utilities will find a match with “Ann,” “Anne,” and “Annette.” If Match exact is set, the input must match the allowed qualifier exactly for the full length of the input. For example, “Ann” will match only with “Ann.”
Selections
Select how you want selection windows placed on the screen:
None = No selection windows are placed on the screen. (default) If you select None, the Row, Col, Ht, and Name fields are cleared, and the cursor moves to the Enumerated field.
Window = When this input field is processed, a selection window is placed on the screen. You must also specify the position for the window with the Row and Col fields and the name of the window in the Name field (see below). Window is similar to List, except that the selection window already exists.
List = When this input field is processed, a selection window is placed on the screen. You must specify the position for the placement of the window, along with one or more text entries that should appear in the window. A second input window, in which you can enter a selection window entry for this field, is displayed.
Allow List/Selection List Entry
If you selected List in the Selections field, specify the list entries that you want to appear in the window. You can enter a maximum of 99, each with a maximum length of 80 characters. The entry input window displays an entry number to the left of the data entry field. Type the entry text in the field, then select Edit Field Functions > Edit Next Entry or Edit Template Functions > Edit Next Entry to enter another entry. To edit the previous entry, select Edit Previous Entry. Entries may include leading blanks, but to define a completely blank entry, enclose the blanks in quotation marks (for example, “ ”). When you have finished specifying entries, press the Exit shortcut.
If your entry in the Allow List/Selection List Entry window is longer than 40 characters, it will wrap. When a word wraps to the second line, it may leave several spaces at the end of the first line. These spaces will become part of the allow list entry. To avoid these unwanted spaces in the entry, when you reach the end of the first line, type a space, and then continue typing the word on the second line. (The space you type at the end of the line only serves to break the word in the Allow List/Selection List Entry window; it will not become part of the allow list entry.)
Row
If you selected List or Window in the Selections field, enter the screen row, relative to the beginning of the data field, at which the upper-left corner of the selection window should be placed.
Col
If you selected List or Window in the Selections field, enter the screen column, relative to the beginning of the data field, at which the upper-left corner of the selection window should be placed.
Ht
If you selected List in the Selections field, you can optionally enter the maximum number of rows in the selection window. Data is organized by column, top to bottom and then left to right. For example, if the height is 3 and there are eight entries, the window will contain three columns (with three entries, three entries, and two entries). If you don’t specify a value in the Ht field, the height of the window is the total number of entries.
If you selected Window in the Selections field, enter the name of an existing selection window.
Select Yes to specify an enumerated data field type. An enumerated data field returns a decimal value for a displayed text entry. This field is valid only when used in conjunction with a Toolkit allow list, selection list, or selection window (including both existing windows and windows built on-the-fly with the Toolkit S_SELBLD subroutine). An enumerated field must be a numeric data type, and it must be large enough to handle the largest number that might be returned.
The default Enumerated value is No. If you select Yes, the cursor moves to the Length field. You must specify the Length, Base, and Step values.
Length
If you selected Yes in the Enumerated field, enter the length of the displayed field. (Note that the length of the displayed field and the length of the actual input field are not necessarily the same.)
Base
If you selected Yes in the Enumerated field, enter the return value assigned to the first item in the allow or selection list.
Step
If you selected Yes in the Enumerated field, enter the value added to each successive item in the allow or selection list.
Template overrides
If the current field references a template, the Template overrides section indicates the template attributes that are overridden. If these fields are read-only, select Edit Field Functions > Access Template Overrides to make them active. (See the description of Parent template for more information about template override flags.)
| 3. | Continue to define field information on the other tabs or, if you are finished defining the field, exit the window to save the field definition and return to the Field Definitions list. |
Method information
The Method tab enables you to associate method names with a field or template. These methods are called by Toolkit at the appropriate time.
When the Toolkit script compiler accesses a field in the repository, the default is to use all method information stored with that field. However, you can still use .FIELD qualifiers in your script file to override one or more of the repository attributes. (A field’s type, size, precision, and dimensional data cannot be overridden.)
On Windows, you can launch Workbench from this tab to define methods for field or template definitions. See Launching Workbench from the Method tab.
| 1. | From the input window where you’re defining the new field or template, go to the Method tab or select Edit Field Functions > Edit Method Information or Edit Template Functions > Edit Method Information. (If you’re in the Field Definitions or Template Definitions list instead of an input window, select Field Functions > Edit Method Information or Template Functions > Edit Method Information.) (See figure 5.) |
| 2. | Enter the method name in the appropriate field, as described below. |
On Windows, you can click the drilldown button to enter the default method name. (The default name is Fieldname_Methodname, e.g., PHONE_ARRIVE.) If you have Workbench installed, see Launching Workbench from the Method tab.
|
|
If you are specifying methods for a template, any references to “fields” in this section refer to fields that use the current template. |
|
|
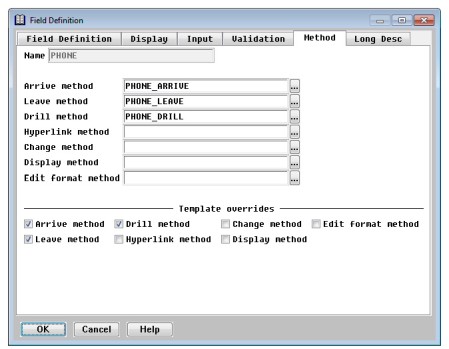
Arrive method
Specify the name of the subroutine (method) to be called before the field is processed by the Toolkit I_INPUT subroutine.
Leave method
Specify the name of the subroutine (method) to be called after the field is processed by the Toolkit I_INPUT subroutine.
Drill method
Specify the name of the subroutine (method) to be called when either a drilldown button is clicked or the I_DRILL menu entry is selected. On Windows, if a drill method is specified, a drilldown button is placed to the right of the input field. When the user clicks the button, the drill method is invoked.
Hyperlink method
Specify the name of the subroutine (method) to be called when either the prompt text is clicked or the I_HYPER menu entry is selected. On Windows, if a hyperlink method is specified and the field is a member of an input set being processed by the Toolkit I_INPUT subroutine, any prompt text associated with the field will be highlighted. When the user clicks on the highlighted text, the hyperlink method is invoked.
Change method
Specify the name of the subroutine (method) to be called after this field is validated by the Toolkit I_INPUT subroutine. A change method performs additional processing after an input field is changed (for example, validating radio button and check box fields).
Specify the name of the subroutine (method) to be called whenever the field is about to be displayed by Toolkit. This method is called after Toolkit has formatted the display according to its own rules. A display method cannot be specified when the “View as” value is Radio buttons or Check box, or when a selection list or window has been specified.
Edit format method
Specify the name of the subroutine (method) to be called by Toolkit whenever text in the field is being formatted for editing purposes. This method is called after Toolkit has formatted the display according to its own rules. An edit format method cannot be specified when the “View as” value is Radio buttons or Check box, or when a selection list or window has been specified.
| 3. | If the current field references a template, update template overrides if necessary. The Template overrides section of the Method tab indicates the template attributes that are overridden. If these fields are disabled, select Edit Field Functions > Access Template Overrides to enable them. (See the description of Parent template for more information about template override flags.) |
| 4. | Continue to define field information on the other tabs or, if you are finished defining the field, exit the window to save the field definition and return to the Field Definitions list. |
Launching Workbench from the Method tab
On Windows, you can use the drilldown buttons to launch Workbench, where you can write or edit methods.
If the method is not yet written,
| 1. | Launch Workbench and display the Choose Method File dialog by doing one of the following: |
- Type a name for the method in the appropriate method field and click the drilldown button.
- Click the drilldown button to enter the default name, which is Fieldname_Methodname, e.g., PHONE_ARRIVE.)
| 2. | To add the method to an existing file, select the desired file from the list of available files. If necessary, click the Browse button to find the file. |
| 3. | To create a new file, type the filename in the field at the top of the dialog and click OK. |
| 4. | Workbench opens (or creates) the file and generates template code for the method type, placing it at the end of the file. |
| 5. | Write the method, save the file in Workbench, and return to Repository. |
If the method is already written,
| 1. | Enter the method name in the appropriate method field. |
| 2. | If you need to edit the method, click the drilldown button. Workbench will launch, open the correct file (or display the Choose Method File dialog if the file is not in the source files for the current project), and place the cursor at the method. Edit it and save the file before returning to Repository. |
Assigning a long description to a field
On the Long Desc tab, you can assign an 1,800-character description to the field. This enables you to store more detailed information about your field and its use.
| 1. | From the input window where you’re defining the new field or template, go to the Long Desc tab or select Edit Field Functions > Edit Long Description or Edit Template Functions > Edit Long Description. |
(If you’re in the Field Definitions or Template Definitions list instead of an input window, select Field Functions > Edit Long Description or Template Functions > Edit Long Description.)
| 2. | Enter your long description. |
| 3. | Continue to define field information on the other tabs or, if you are finished defining the field, exit the window to save the field definition and return to the Field Definitions list. |
