A template is a set of field characteristics that can be assigned to one or more field definitions (up to 6,000) and one or more template definitions (up to 3,000). Templates provide consistency for your fields throughout all structures in your repository, and also reduce data entry. They also provide an easy way to modify a common field type (for example, changing all date fields from d6 to d8). You can assign a template when you define or modify a field or template. You can define a maximum of 9,999 templates.
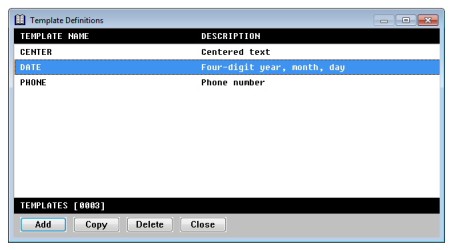
To display the Template Definitions list, select Modify > Templates. For each template, the template name and description are displayed. The total number of templates in your repository is displayed at the bottom of the window. (See figure 1.)
|
|
Defining a new template
You can define a new template from scratch or by copying and modifying an existing template.
| 1. | From the Template Definitions list, |
- To define a template from scratch, select Template Functions > Add Template.
- To define a template by copying, highlight the template you want to copy, and then select Template Functions > Copy Template.
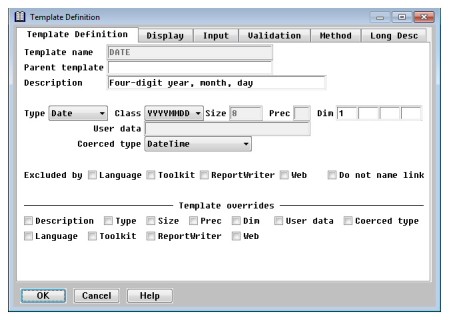
The Template Definition window displays with tabs on which you can define template information. Instructions are given in this section for the Template Definition tab, but not for the other tabs, as they are the same as the tabs for fields.
- Template Definition tab, for defining basic template information; see below.
- Display tab, for defining how you want the field to display in a Toolkit input window or ReportWriter report; see Display information.
- Input tab, for defining how field input is handled in a Toolkit input window; see Input information.
- Validation tab, for defining how field input is validated in a Toolkit input window; see Validation information.
- Method tab, for associating methods (that are called by Toolkit) with fields; see Method information.
- Long Desc tab, for assigning a long description; see Assigning a long description to a field.
Defining basic template information
|
|
| 1. | Enter or modify data as instructed below. |
Enter a unique template name. The template name can have a maximum of 30 characters and must begin with a letter. The remaining characters can be letters, digits, underscores (_), or dollar signs ($).
If desired, enter the name of a parent template to use to create the current template. (A parent template is a template for a template.) Up to 3,000 templates can use the same parent template. To display a list of available templates, select Edit Template Functions > List Selections.
All attributes of the parent template are copied to the current template, including display, input, validation, and method information. You can override any of the parent template attributes simply by specifying new values. If the parent template is later modified, only the attributes that have not been overridden are copied to the child template. The check boxes at the bottom of the window indicate the attributes of the parent template that have been overridden in the current template.
Repository sets these flags when you exit the window, but you can also set them manually. You might want to do this when an attribute matches the parent and you don’t want it to be changed later if the parent changes. By default, these fields are read-only. To modify them, select Edit Template Functions > Access Template Overrides. This menu entry is a toggle: select it a second time and the override fields revert to read-only. The Access Template Overrides setting remains in effect for all field and template definitions until you change it.
Description
Enter a description for the template, with a maximum of 40 characters. The description displays on the Template Definitions list.
Type
Select the type of data the field will contain:
Alpha
Decimal
Integer
Date
Time
User
Binary
Boolean
Enum
AutoSeq
AutoTime
If you select Date, Time, or User, the cursor moves to the Class field. If you select Enum, the cursor moves to the Enumeration field (see Enumeration below).
|
|
In Synergy DBL, the Binary data type is treated as an alpha. In xfNetLink Java (when genjava is run with the -c 1.5 option) and xfNetLink .NET. a Binary data type field in a structure is converted to a byte array on the client, and can be used, for example, to store an RFA. For xfNetLink Synergy clients, a Binary data type field is converted to a string. In xfODBC, a Binary data type field is described as a binary field (SQL_BINARY). This is also true of a User type field with a class of binary (see Class below), but in this case you can use the routines for user-defined data types in xfODBC to manipulate the data read from the ISAM file and return it as a binary field to the ODBC-enabled application. |
If you selected Date or Time in the Type field, specify the storage format in the Class field:
- Date fields
YYMMDD = two-digit year, month, day
YYYYMMDD = four-digit year, month, day
YYJJJ = two-digit year, Julian day
YYYYJJJ = four-digit year, Julian day
YYPP = two-digit year, period
YYYYPP = four-digit year, period
- Time fields
HHMM = hour, minute
HHMMSS = hour, minute, second
If you selected User in the Type field, specify the user subtype in the Class field. User subtypes are used by the xfODBC user-defined processing routines and are available in the gs_inpfld structure within UI Toolkit’s user-defined processing routines. Subtypes also affect data type mapping in xfNetLink Java and xfNetLink .NET; see Appendix B: Data Type Mapping for xfNetLink Java or Appendix C: Data Type Mapping for xfNetLink .NET for details. The available subtypes are
Alpha
Numeric
Date
Binary
Additional date storage formats are supported by xfODBC. See Appendix B: Date and Time Formats for more information.
User data
If you selected User in the Type field, specify a string of up to 30 characters to identify your user-defined data type, and press Enter to save it.
In a UI Toolkit input window, a user type field flags the runtime input processor to call the ECHKFLD_METHOD, EDSPFLD_METHOD, and EEDTDSP_METHOD subroutines for additional processing. The user data string is passed to these subroutines to be used as a control code. The user subtype (class) is available in the gs_inpfld structure.
User type fields also flag ReportWriter to call user-overloadable subroutines (for example, RPS_DATA_METHOD which formats the data for display). See Customizing ReportWriter Routines for more information about the user-overloadable subroutines called by ReportWriter.
User type fields also flag xfODBC to call user-overloadable subroutines to process the data for those fields. The user data string is passed to these routines. See Creating Routines for User-Defined Data Types for more information.
If you selected Enum in the Type field, enter the enumeration name or select Edit Template Functions > List Selections and choose it from the list.
|
|
The Enum data type is not supported by UI Toolkit. To use an enumerated data field with an allow list or selection list or window, use the Enumerated field on the Validation tab. See Enumerated for more information. |
Coerced type
If the structure that this field belongs to is included in an xfNetLink Java JAR file or an xfNetLink .NET assembly, you can optionally specify a non-default data type for the field to be coerced to on the client side. Type coercion is available when Type is one of the following: Decimal, Integer, Date, Time, User.
- For Decimal (with or without precision) and Integer types, select Default to use the default xfNetLink type mapping.
- Date types can be coerced when the format is one of the following: YYMMDD, YYYYMMDD, YYJJJ, YYYYJJJ.
- User types can be coerced only when the user subtype (i.e., the Class field) is Date and the User data field contains ^CLASS^=YYYYMMDDHHMISS or ^CLASS^=YYYYMMDDHHMISSUUUUUU (case sensitive).
- For Date, Time, and User types, the default coerced type is DateTime.
See Appendix B: Data Type Mapping for xfNetLink Java and Appendix C: Data Type Mapping for xfNetLink .NET for more information on data type mapping and coercion in xfNetLink.
Size
Enter the maximum number of characters the template field can contain. The following restrictions apply:
- The maximum size of an alpha, binary, or user field is 99,999.
- The maximum size of an implied-decimal field is 28.
- Valid sizes for integer fields are 1, 2, 4 and 8.
- If the data type is date or time, the size is automatically set when you select a storage format and cannot be modified.
- If the data type is Boolean or Enum, the size is automatically set to 4 and cannot be modified.
- If the data type is AutoSeq or AutoTime, the size is automatically set to 8 and cannot be modified.
Precision
If the data type is implied-decimal, enter the number of characters to the right of the decimal point. This value must be between 1 and 28, inclusive, and must be less than or equal to the size of the field.
Dim1 – 4
If the template defines an array, enter the number of elements in each dimension. The maximum number of dimensions is 4. The maximum number of elements per dimension is 999. If the template doesn’t define an array, the Dim field displays 1.
This value determines whether a template field is available to the Synergy compiler. Select this option if you do not want the template field to be available to the compiler. Excluded by Language is cleared by default, which means the field will be included when using the .INCLUDE compiler directive to reference the structure to which this field belongs, and will be included in any definition files generated by the Generate Definition File utility. This feature is useful when your repository contains overlay fields defined solely for the purpose of referencing group elements from within ReportWriter.
Excluded by Toolkit
This value determines whether a template field is available to UI Toolkit. Select this option if you do not want to be able to reference the template field from Toolkit. Excluded by Toolkit is cleared by default, which means the field can be referenced by the Script compiler, Composer, and the IB_FIELD subroutine.
This value determines whether a template field is available in ReportWriter as a selectable field. Select this option if you do not want this template field to be selectable in ReportWriter. Excluded by ReportWriter is cleared by default, which means the field can be selected for inclusion in a report. This flag can also be honored when generating a system catalog in xfODBC; see Setting catalog generation options for details on including and omitting fields.
Excluded by Web
This value determines how the template field is treated by xfNetLink. The Excluded by Web flag should be used only to control how fields in an overlay are handled. If this field is not part of a structure that contains overlays, do not select this option. Select Excluded by Web if you do not want this template field to be included in a Synergy JAR file or assembly. Excluded by Web is cleared by default, which means that all fields are included in the Synergy component. For details on using this flag to control how overlays are handled, see How overlays are handled.
ReportWriter can use name links you establish in Repository to access related files. This field determines whether the template field is name linked to its parent (if one exists). By default, Repository will use the name of the parent to generate name links. Select this field if you want Repository to use the template field’s name when generating name links. (See also Generate Cross-Reference utility (rpsxref).)
If the current template references a parent template, the Template overrides section indicates the template attributes that are overridden. If these override fields are read-only, select Edit Template Functions > Access Template Overrides to make them active. (See the description of Parent template for more information about template override flags.)
| 2. | To define display, input, validation, or method information, or to add a long description for a template, go to the desired tab or select the entry from the Edit Template Functions menu. Refer to the following sections for instructions: |
Assigning a long description to a field (Long Desc tab)
| 3. | Exit the window to save the new template and return to the Template Definitions list. |
Modifying a template
| 1. | Highlight the template in the Template Definitions list and press Enter. The Template Definition window is displayed, with the tab that you viewed last on top. |
| 2. | Modify data as desired on any of the tabs. The template name cannot be modified. |
If you modify the parent template name, all attributes of the new parent (including display, input, validation, and method information, as well as the long description) are copied to the current template, with the exception of any attributes that were overridden in the current template. See the description of Parent template for more information.
For details on completing the fields on each tab, refer to the relevant section:
Defining basic template information (Template Definition tab)
Assigning a long description to a field (Long Desc tab)
| 3. | Exit the window to save your changes and return to the Template Definitions list. |
If the template that you’re modifying is assigned to one or more fields or templates, when you save your changes you are prompted
Modifying template “NAME” will affect one or more template, field, and key definitions.
Are you sure you want to save your modifications?
The default response is No. If you press Enter, the template modifications are ignored and you are returned to the Template Definitions list. If you select Yes, the new template information is applied to all fields and templates that refer to it. Repository also applies the changes to any fields that reference any templates that in turn reference the template being modified.
|
|
Any attribute of any field or template that overrides a template or parent template attribute is not modified. |
Additionally, all keys that use the updated fields are updated (key size and key data type). The record size of all affected structures is updated.
Deleting a template
You cannot delete a template that is assigned to a field or to another template.
| 1. | Highlight the template in the Template Definitions list. |
| 2. | Select Template Functions > Delete Template. |
| 3. | At the prompt, select Yes to delete the template or No to cancel the deletion. |
