The component generation tools enable you to create a Java JAR file of Synergy methods. The JAR file can be used in any Java application to make remote calls to Synergy routines. To create a JAR file, you must do the following:
- Create a Synergy/DE Java Component Project in Workbench and specify information about how the JAR file should be constructed.
- Generate the Java class wrappers.
- Edit the Java code, if necessary.
- Build the JAR file.

You can optionally generate class wrappers and build the JAR file from the command line rather than from Workbench. See Creating a Java JAR file from the command line.
Creating a Synergy/DE Java Component project
| 1. | In Workbench, select Project > New, and then select Synergy/DE Java Component from the list of project types. (Expand the Synergy/DE node in the Project type display to see the Synergy/DE Java Component node.) |
| 2. | Give the project a name in the Project name field, and indicate whether you want to create a new workspace or add the project to an existing workspace. For more information on using this dialog, as well as information about basic Workbench features, see the Workbench Help. |
|
|
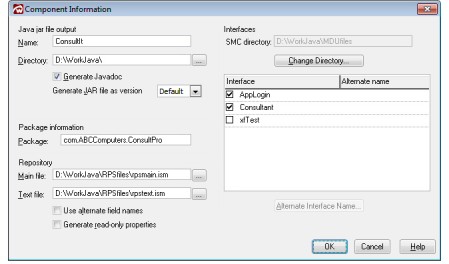
| 3. | Specify the following information in the Component Information dialog box. (This dialog displays automatically when you create a new Java component project. If you need to display it later, select Build > Component Information.) |
Name
Enter a name for the JAR file. The default is the project name.
Directory
Specify the directory in which to place the JAR file. The default is the project location. If you enter a logical in this field, it must be followed by a colon (e.g., MYDIR:). This directory will also hold the intermediate files that are used to create the Java class wrappers and JAR file: the XML file, the batch file, and the manifest file. See the explanation for the Package name field below for more information on the directory structure created when you generate class wrappers.
Generate Javadoc
Indicate whether you want to generate Javadoc™ HTML files. Javadoc is generated from information in the .java files and serves as the API documentation for the Java classes you are generating. In order to have useful Javadoc, you must include comments for your methods and parameters. The Javadoc HTML files are created when you build the JAR file. See Generating Javadoc for additional information.
Generate JAR file as version
Indicate the version of the JRE that the JAR file should be built to target. Select Default to use the version of Java installed on the machine where the JAR file is built.
Specify a name for the package that will contain the generated classes. The default is the JAR file name. Use dot notation to indicate multiple directory levels. The maximum length for package name is 101 characters.
For example, the package name com.CompanyName.ProductName results in the directory structure com\CompanyName\ProductName, which is created beneath the directory specified in the Directory field. If you specify a multilevel package name, the generated class files are placed in the lowest level directory (ProductName, in our example).
Repository main file
If any of the methods that will be included in this JAR file pass structures as parameters, specify the location of the repository main file for those structures. This must match the repository that was used when entering data in the SMC. If you specify a main file, you must also specify a text file.
The default is the value of the environment variable RPSMFIL. If it is not defined, the default is RPSDAT:rpsmain.ism. If neither RPSMFIL nor RPSDAT are defined, the default is rpsmain.ism in the path specified in the Working directory property of the project. If the Working directory is not defined, the default is rpsmain.ism in the location where the project is stored.
Repository text file
If any of the methods that will be included in this JAR file pass structures as parameters, specify the location of the repository text file for those structures. This must match the repository that was used when entering data in the SMC. If you specify a text file, you must also specify a main file.
The default is the value of the environment variable RPSTFIL. If it is not defined, the default is RPSDAT:rpstext.ism. If neither RPSTFIL nor RPSDAT are defined, the default is rpstext.ism in the path specified in the Working directory property of the project. If the Working directory is not defined, the default is rpstext.ism in the location where the project is stored.
Use alternate field names
Indicate whether you want to use the value in the Alternate name field in Repository instead of the value in the Name field as the property name. If not selected, the field name in the structure becomes the property name in the Java class. If selected, the value in the Alternate name field is used if it exists; else, the value in the Name field is used.
Generate read-only properties
Indicate whether you want fields flagged as read-only in Repository to be generated as read-only properties in the structure classes. These properties will have a “get” method but no “set” method. If you are planning to use the classes in your JAR file as JavaBeans, note that JavaBeans require that properties be accessible with both get and set methods.
SMC directory
This field displays the path for the Synergy Method Catalog that this JAR file uses. The default is XFPL_SMCPATH; if it is not set, the default is DBLDIR. To change the SMC directory, click the Change Directory button to display the Browse for SMC Directory dialog box. Navigate to the directory, double-click to select it, and click OK. The selected path will display in the SMC directory field and the list of interfaces will be refreshed, displaying all interfaces in the selected SMC.
Interfaces
Select the interfaces you want to include in the JAR file by clicking in the box to the left of the interface name. A Java class, named with the interface name, will be generated for each selected interface.
Alternate name
You can provide an alternate name for any interface you select. To specify an alternate name, highlight a selected interface, and then click the Alternate Interface Name button and enter another name in the dialog that displays.
You may wish to use an alternate name if the interface name in the SMC is not what you want users to see as the class name. In addition, if your interface names differ only in case, or if you have a structure with the same name as an interface, you can use the alternate interface name to avoid having numbers appended to the class names. See the note under the Interface name field for a full explanation.
To remove an alternate interface name, clear the check box for the interface and then reselect it.
| 4. | Click OK in the Component Information dialog box. |
Generating Java class wrappers
| 1. | To generate Java class wrappers, select Build > Generate Class Wrappers. If you have previously generated class wrappers for this project, you will be prompted to overwrite them. If you’re regenerating wrappers for the same interfaces, the .java files will be overwritten and any changes you made to them will be lost. |
This command will do the following:
- Run the SMC/ELB Comparison utility, smc_elb.exe. (See SMC/ELB Comparison utility for more information.)
- Create a Java source file for each interface you selected and for each structure, group, and enumeration within the selected interfaces.
- Create a manifest file that names the classes in the JAR file and indicates they can be JavaBeans™.
- Create a batch file to be used later to build the JAR file.
- Create files named filename_srclist.dat and filename_clslist.dat (where filename is the name of the JAR file), which are used in conjunction with the batch file to create the JAR file.
- Add the .java files to the project. You can access them from the Projects tab or the Symbols tab in the project toolbar.
| 2. | Edit the files, if necessary, before building the JAR file. See Editing the Java source files. |
Building a JAR file in Workbench
|
|
If you are targeting an earlier version of Java than you are using (e.g., if you are using Java 11 and targeting Java 10), you must set the XFBOOTCLASSPATH and XFEXTDIRS environment variables before building the JAR file. If either is missing or not set to a valid location, the compile will fail. Set XFBOOTCLASSPATH to the complete path of the rt.jar file of the version you are targeting, usually java.home\lib\rt.jar. (For example, c:\Program Files (x86)\Java\jdk\jre\lib\rt.jar.) Set XFEXTDIRS to the directory that contains the other classes and jar files (of the version you are targeting) that are required by your application, usually java.home\lib. (For example, c:\Program Files (x86)\Java\jdk\jre\lib.) There are a number of ways to set environment variables so that they may be used by Workbench. See "Setting Workbench environment variables" in the Workbench Help for details. |
| 1. | Verify that the Java component project is the active project. |
| 2. | Select Build > Build Jar File. This command will do the following: |
- Compile the .java files into .class files.
- Build the JAR file.
- Include the manifest file in the JAR file.
- Produce the Javadoc HTML files if the “Generate Javadoc” option was selected in the Component Information dialog box when you created the class wrappers.
