Relations can be associated with each structure in a file. Relations enable you to link the keys of one structure with the keys of other structures. A maximum of 99 relations can be defined for a structure.
Defining relations enables xfODBC and ReportWriter to access information in related structures. For example, you might relate a customer ID key in a sales transaction file with a customer ID key in a customer file. Then in xfODBC, you could create SQL statements that retrieve transaction information and associated customer information. Given the same scenario, in ReportWriter the additional information about the customer would be automatically accessed when you created a sales transaction report.
In order for ReportWriter to be able to cross-reference data between files, you must create relations between structures. (For information about how ReportWriter can access related files without explicit relationships being defined in the repository, see Generate Cross-Reference utility (rpsxref).)
Displaying the Relation Definitions list
To display the Relation Definitions list,
| 1. | In the Structure Definitions list, highlight the structure for which you want to define a relation. |
| 2. | Select Structure Functions > Edit Attributes. |
| 3. | Select Attributes > Relations. |
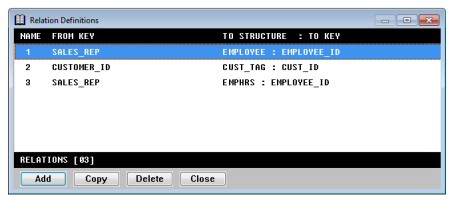
The Relation Definitions list displays the following information about relations for the current structure. (See figure 1.)
NAME—The unique relation name.
FROM KEY—The name of the key to use in the current structure.
TO STRUCTURE—The name of the structure to which the current structure is related.
TO KEY—The name of the key related to in the “to” structure.
The total number of relations for this structure is displayed at the bottom of the list.
|
|
Reordering relations in the Relation Definitions list
| 1. | Highlight the relation you want to move. |
| 2. | Select Relation Functions > Reorder Relations. The highlighted relation is now enclosed in square brackets ([ ]). |
| 3. | Use the up and down arrow keys to move the bracketed relation to another location in the list. |
| 4. | Select Reorder Relations again to exit move mode. The relation is inserted at the new location. |
Defining a new relation
You can define a new relation from scratch or by copying and modifying an existing relation. If relations already exist, new relations are inserted below the highlighted entry.
| 1. | From the Relation Definitions list, |
- To define a relation from scratch, select Relation Functions > Add Relation.
- To define a relation by copying, highlight the relation you want to copy, and then select Relation Functions > Copy Relation.
The Relation Definition input window is displayed.
|
|
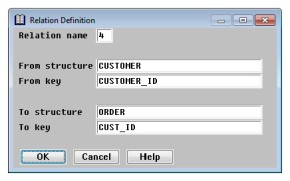
| 2. | Enter or modify data in each field as instructed below. The example shown in figure 2 relates the CUSTOMER_ID key in the customer file to the CUST_ID key in the order file. |
Relation name
The relation name is the way the relation is identified when related files are selected in ReportWriter. A relation must have a unique name within the current structure, and it must be numeric. A default relation name is displayed; change it if desired.
From structure
This read-only field displays the name of the current structure.
From key
Enter the name of the key you want to relate. To display a list of the keys for the current structure, select Edit Relation Functions > List Selections. To examine a key in more detail, see Examining a key.
To structure
Enter the name of the structure to which you want to relate the first structure. To display a list of available structures, select Edit Relation Functions > List Selections.
To key
Enter the name of an access key to which to relate the “from” key. To display a list of access keys in the selected “to” structure, select Edit Relation Functions > List Selections. To examine a key in more detail, see Examining a key.
We recommend that related keys have the same key data type and size, but to add more flexibility to relationships, Repository does not require this.
| 3. | Exit the window to save the new relation. |
If you want to examine a relation in more detail, see Examining a relation in detail.
When you’re entering a “from” or “to” key in the Relation Definition input window, you can view more detailed information about the key you’re thinking of using.
| 1. | With your cursor in the From key or To key field, select Edit Relation Functions > List Selections. The list of Available Keys is displayed. |
| 2. | Highlight the key whose segments you’d like to view. |
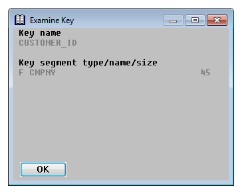
| 3. | Select Key Functions > Examine Key to display the key name and its segments. (See figure 3.) |
If the key allows duplicates, the word “Dups” is displayed to the right of the key name. The segment information includes the type and size of each key segment: F (Field), L (Literal), E (External), R (Record number).
If the segment is a field or external segment, the field name is specified. To display the field description instead of the field name, select Examine Key > Toggle View. If the segment is a literal, the literal string is displayed.
|
|
Examining a relation in detail
| 1. | From the Relation Definitions list, highlight the relation you’d like to view. |
You can also examine a relation from the Relation Definition input window while you’re defining or modifying a relation.
| 2. | Select Relation Functions > Examine Relation. This window describes the key segments that are used in the current relation, and contains the names of the “from” structure, the “from” key, the “to” structure, and the “to” key. (See figure 4.) |
|
|
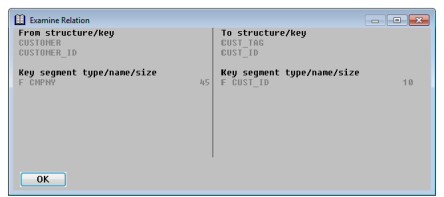
If a key allows duplicates, “Dups” is displayed to the right of the key name. The segment information includes the type and size of each key segment: F (Field), L (Literal), E (External), R (Record number).
If the segment is a field or external segment, the field name is specified. To display the field description instead of the field name, select Examine Relation > Toggle View. If the segment is a literal, the literal string is displayed.
| 3. | Exit the window. |
Modifying a relation
| 1. | From the Relation Definitions list, highlight the relation you want to modify and press Enter. |
| 2. | In the Relation Definition window, modify data as desired. For details on the fields, see step 2 under Defining a new relation. The relation name and the “from” structure cannot be changed. |
| 3. | Exit the window to save your changes. |
Deleting a relation
| 1. | Highlight the relation in the Relation Definitions list. |
| 2. | Select Relation Functions > Delete Relation. |
| 3. | At the prompt, select Yes to delete the specified relation or No to cancel the deletion. |
