When you first start Repository, the Modify menu is pulled down. (See figure 1.) Once you select the area you want to work in (structures, files, etc.), additional menus will display.
|
|
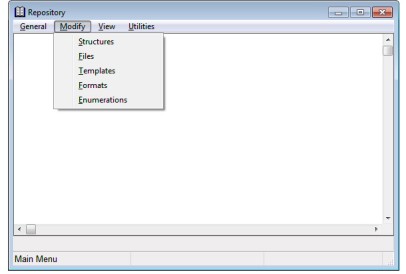
At the very bottom of the screen is the footer. It contains the name of the current menu or function (on the left), processing messages (in the center), and the name of any structure, template, or other element that is currently selected (on the right).
Just above the footer is the information line. It contains information such as whether the “Find Entry” function is operating in forward or reverse mode and also displays a brief field-level help message when you are in an input window.
Making a menu selection (Unix and OpenVMS)
You can select a menu entry using the arrow keys, quick-select characters, or shortcuts. To use the arrow keys or quick-select characters, you must first activate the menu bar by pressing the process-menu key, Ctrl+P. The menu bar is deactivated after you select a menu entry. You can also deactivate it by pressing the process-menu key again.
- Arrow keys: Use the Left and Right Arrow keys to move across the activated menu bar to select a menu. When you move to a menu, it drops down, displaying the entries. Use the Up and Down Arrow keys to move among the menu entries. Press Enter to select a highlighted entry.
- Quick-select characters: A quick-select character is a single character that accesses a menu entry. When a menu is dropped down, type the quick-select character to highlight the menu entry and select it. If the quick-select character is not unique in the menu, it simply highlights the entry, and you will need to press Enter to select the highlighted entry.
- Shortcut keys: A shortcut is a key or key sequence that is associated with a menu entry, and which enables you to execute a function directly without selecting it from a menu. (The exception to this rule is arrow keys: arrow keys can be used as shortcuts only when the menu is not enabled.) The shortcut keys are listed to the right of the menu entry and vary depending on the type of terminal. Not all menu entries have shortcuts. See Appendix E: Repository Distributed Shortcuts for a list of the most common shortcuts as they are provided with your original Repository distribution. (Note that shortcuts can be reassigned by your system administrator.)
Entering data
The documentation refers to both the Enter and Return key as Enter. After you have finished typing data for a particular field, pressing Enter causes the information to be accepted.
Repository converts most of the data you enter into uppercase letters. Descriptions or headings can be entered in either uppercase or lowercase.
Getting field-level help
For each input field, the information line displays a brief help message telling you what data to enter. For more detailed information, select General > Help to display a help window for the field. To close the help window, press Enter.
Accepting or overriding default values
In some Repository fields, the program enters a default value for you. You can override the default by typing your own data, or you can accept the default by pressing Enter. For optional fields, you can override the default and leave the field blank by pressing the spacebar or the Backspace key and then pressing Enter.
Moving between fields
On Windows, press the Tab and Shift+Tab keys to move between fields in a window. You can also use the mouse to move directly to a specific field.
On Unix and OpenVMS, you can use the Previous Field and Next Field entries on the Input menu to move between fields.
Skipping a field
To skip optional fields, simply press Enter. To remove a value from an optional field and leave it blank, press the spacebar or the Backspace key and then press Enter.
Editing a field (Unix and OpenVMS)
Changing the cursor direction
When you begin entering text in a field, the cursor direction is set to forward. To toggle between moving forward and backward, use the Direction option (on the Edit menu). This setting does not actually change the direction in which the cursor moves as you type; rather, it is honored by some of the options on the Edit menu. (Refer to the tables on the next page for details on which options honor cursor direction.) The current direction is displayed on the right side of the information line.
Switching between insert and overstrike modes
When you begin entering text in a field, the editor is in insert mode. Any data you enter is placed at the current cursor position, and the existing data is moved to the right as you type. To change to overstrike mode, so that the data at the cursor is replaced with the data you type, use the Insert/Overstrike option (on the Edit menu). The current mode is displayed on the right side of the information line.
Editing a multi-line text field
When you start to type in a multi-line text field, the Edit menu appears on the menu bar. See the table below for an explanation of the available options on this menu.
To edit existing text in a multi-line field, use the right arrow key to move the cursor before you begin typing; the Edit menu will display on the menu bar, and then you can use the up and down arrow keys to move to the line you need to edit. (When you first access a multi-line text field that already has text in it, the entire field is selected. If you simply start typing, all existing text will be deleted. If this happens, you can abandon changes to recover the text.)
|
From the Edit menu, select… |
|
|---|---|
|
Move up one line |
Up One Line. The cursor stays in the same column position. |
|
Move down one line |
Down One Line. The cursor stays in the same column position. |
|
Move left one character |
Left One Character. |
|
Move right one character |
Right One Character. |
|
Move to the next word |
Move One Word. Cursor direction must be set to Forward. |
|
Move to first character of the current word |
Move One Word. Cursor direction must be set to Reverse. If the cursor is already on the first character of the word, it will move to the first character of the previous word. |
|
Move to the beginning of the line |
Beginning of Line. If the cursor is already positioned at the beginning of a line, it will move to the beginning of the previous line. |
|
Move to the end of the line |
End of Line. This moves the cursor past the last character in the current line. If the cursor is already positioned after the last character on the line, movement depends on the cursor direction setting.
|
|
Re-wrap text (join lines) |
Join Lines. This function rewraps the text from the cursor location to the end of the paragraph. |
Deleting the data in a field
You can erase the contents of the current field by selecting Input > Clear Field.
|
From the Edit menu select… |
|
|---|---|
|
The current character |
Delete Character. |
|
From the cursor to the beginning of the next word |
Delete Word. Cursor direction must be set to Forward. Note that this deletes all characters up to the beginning of the next word, including the current character and the space before the next word. |
|
From the cursor to the beginning of the current word |
Delete Word. Cursor direction must be set to Reverse. All characters to the left of the cursor in the current word are deleted. |
|
From the cursor to the end of the line |
Delete to End of Line. The end-of-line character is not deleted. |
|
From the cursor to the end of the line (including the end-of-line character) |
Delete Line. Cursor direction must be set to Forward. If the next line contains text, that text moves up to the current line. |
|
From the cursor to the beginning of the line |
Delete Line. Cursor direction must be set to Reverse. Note that if the cursor is positioned on the first character of a line, this deletes the previous line of text, including the end-of-line character, and the remaining text moves up one line. |
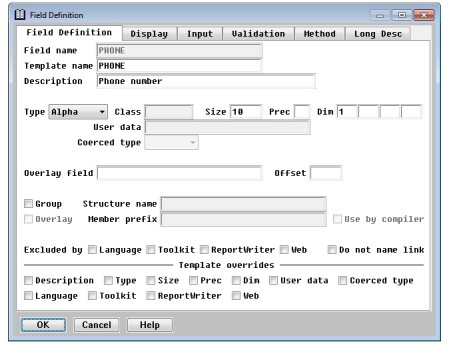
Moving between tabs in a tabbed dialog
Figure 2 is an example of a tabbed dialog.
- On Windows, click the tab you want to display or press Ctrl+Tab to cycle through the tabs. To move back to the previous tab, press Ctrl+Shift+Tab.
- On Unix and OpenVMS, press Tab until the desired tab is displayed. To move back to the previous tab, press F8.
If you haven’t completed the required fields on the primary tab in a tabbed dialog, you may not be able to move to the other tabs.
|
|
To reset a field to its original value, select Input > Reset Field (Unix and OpenVMS).
To abandon changes to all fields in a window, select General > Abandon. In a tabbed dialog, this abandons all changes to all tabs. On Windows, you can also click the Cancel button to abandon changes for the current window or for all tabs in a tabbed dialog.
Using lists
Repository uses two types of lists: modifiable and non-modifiable.
Modifiable lists
Modifiable lists contain entries, such as fields or structures, that you can select and edit. You can also add, delete, and sometimes move entries in the list. The Relation Definitions list in figure 3 is a modifiable list.
|
|

To edit an entry in a modifiable list, highlight the entry and press Enter. On Windows, you can also double-click an entry to edit it.
To exit a modifiable list, press the Exit shortcut or (on Windows) click the Close button.
Because Repository supports multi-user access, a list that you are viewing may change when another users adds or deletes definitions. You can refresh the definition lists for structures, files, templates, formats, and enumerations by pressing F5.
Non-modifiable lists contain entries that you can select, but cannot change, add, or delete, such as the Available Structures list in figure 4. By default, non-modifiable lists display entry names. To display entry descriptions instead, select List > Toggle View. If you toggle the view for a format name, the format string is displayed. Since aliases do not have descriptions, if you toggle the view on a structure list that contains aliases, you will no longer see the aliases.
|
|
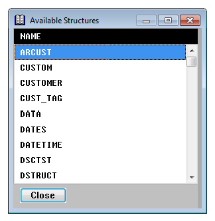
To select an entry in a non-modifiable list, highlight it and press Enter. On Windows, you can also double-click.
To exit a non-modifiable list without making a selection, press the Exit shortcut or (on Windows) click the Close button.
Searching for a list entry
In both modifiable and non-modifiable lists, select Find > Find Entry to search for a list entry. At the prompt, enter the name or partial name of the entry you wish to find, and select whether you want to find items that start with the search text or contain the search text. (The “contains” option will also find entries that start with the search text.) Indicate if you want to search forward (down the list) or in reverse (up the list) and click OK to search.
If Repository finds a match, it highlights the first matching entry in the list. Select Find > Find Next to continue the search. The search will wrap when it gets to the end of the list.
Using selection windows
Like a non-modifiable list, a selection window (often referred to as a drop-down list) contains a list of items from which you can choose.
To select an item on Unix and OpenVMS, press any key to display the list, use the arrow keys to highlight an item, and then press Enter. On all systems, you can type the first letter of the item to highlight it, and then press Enter. On Windows, you can also select an item with the mouse.
To redisplay a selection window on Unix and OpenVMS once you’ve made a selection, press any non-shortcut key at the prompt. If the key you press is the first letter of one of the selection window entries, that entry is highlighted when the selection window is displayed.
Exiting the current function
To save your changes and exit the current input window or list, select General > Exit. You are returned to the previous window or menu. In a tabbed dialog, you can exit the window from any tab. The next time you return to that dialog, that tab will be displayed.
On Windows, you can click the OK button to save your changes and exit the current input window.
Exiting Repository
There are a couple of ways to exit Repository:
- Press the Exit shortcut to back out of each function until you get to the Repository main menu. Then, press the Exit shortcut again or select General > Quit.
- Select General > Quit to exit Repository immediately from anywhere—regardless of what function you’re currently in.
